Mybatis是如何解析配置文件的
本文从最原始的 Mybatis API,从调用一个 build 方法开始分析,看 Mybatis 是如何一步步解析我们的配置文件,在了解其底层原理的同时,可以更加清楚的知道 Mybatis 为我们提供了那些可扩展的组件。
构建SqlSessionFactory
String resource = "mybatis-config.xml";
InputStream inputStream = Resources.getResourceAsStream(resource);
SqlSessionFactory sqlSessionFactory = new SqlSessionFactoryBuilder().build(inputStream);
如果你使用过 Mybatis ,那么一点对这几行代码不陌生,在上面的代码中,先通过 Resources 获取一个输入流,然后把这个输入流交给了 SqlSessionFactoryBuilder build 方法从而构建出了一个 SqlSessionFactory 会话工厂,本次就从这几行语句着手分析看它内部都做了些什么,是如何去解析我们的配置文件的。
首先从 Resources.getResourceAsStream(resource) 这一行代码开始分析,它接受一个文件路径,然后返回一个输入流,其实内部就是通过 classLoader.getResourceAsStream 这个方法去类路径去寻找这个文件。
InputStream getResourceAsStream(String resource, ClassLoader[] classLoader) {
  for (ClassLoader cl : classLoader) {
    if (null != cl) {

      // try to find the resource as passed
      InputStream returnValue = cl.getResourceAsStream(resource);

      // now, some class loaders want this leading "/", so we'll add it and try again if we didn't find the resource
      if (null == returnValue) {
        returnValue = cl.getResourceAsStream("/" + resource);
      }

      if (null != returnValue) {
        return returnValue;
      }
    }
  }
  return null;
}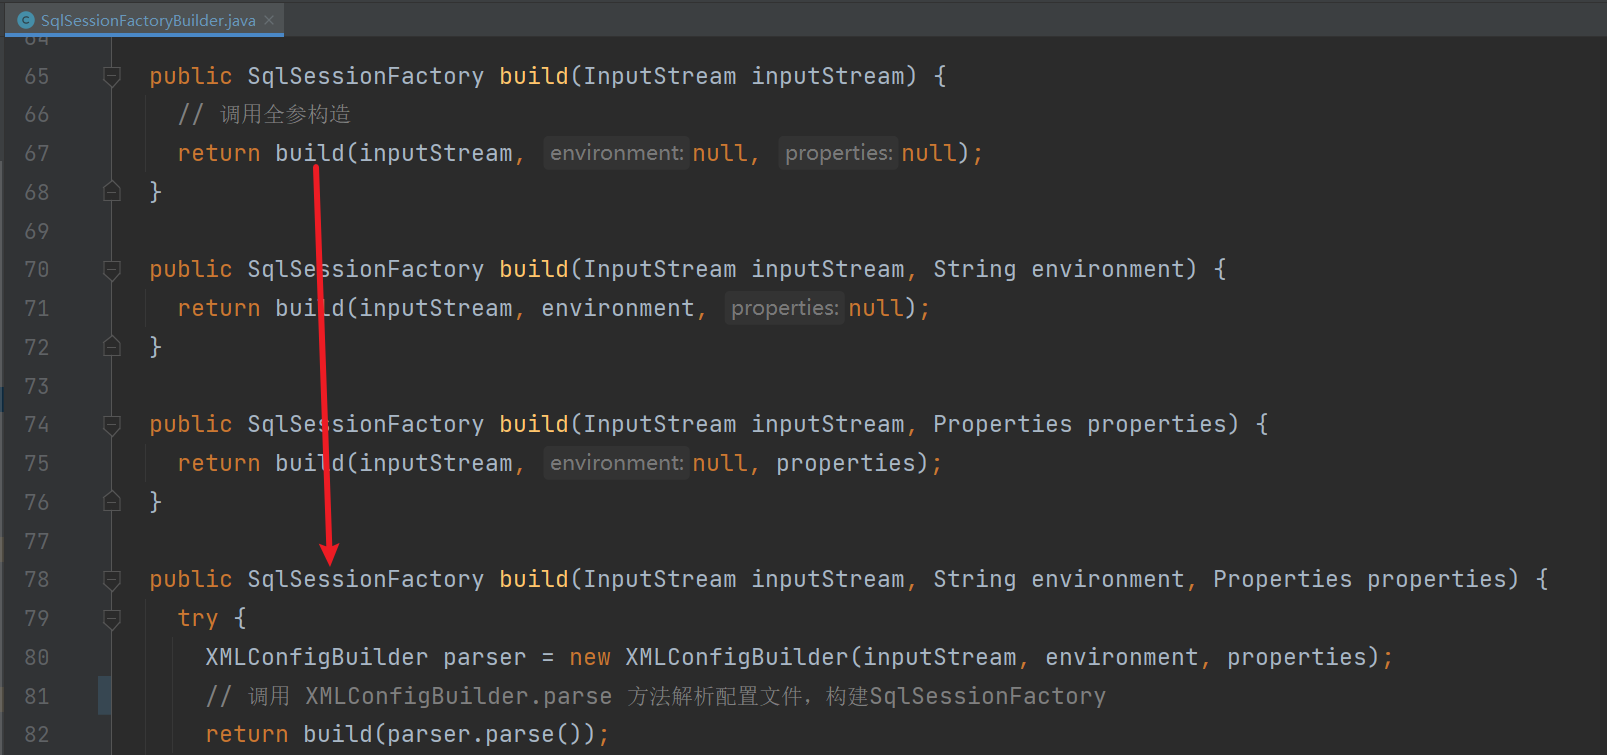
当我们得到一个输入流以后,就会去调用 SqlSessionFactoryBuilder().build 方法,一般来说我们都只传了一个 InputStream 其实它还提供了另外两个参数 String 类型的 environment 和 一个 Properties 对象,environment 用来决定使用那个environment 标签,而 Properties 是加载一些自定义的属性。
接下来就是调用 parse 方法对我们的 xml 配置文件进行解析:
public Configuration parse() {
  // 判断是否解析过了,重复解析抛异常
  if (parsed) {
    throw new BuilderException("Each XMLConfigBuilder can only be used once.");
  }
  parsed = true;
  // 解析 xml 配置文件 /configuration 节点
  parseConfiguration(parser.evalNode("/configuration"));
  return configuration;
}
这里它会去判断 xml 是否已经解析过了,如果解析过了会抛出异常,然后调用 parseConfiguration 方法获取
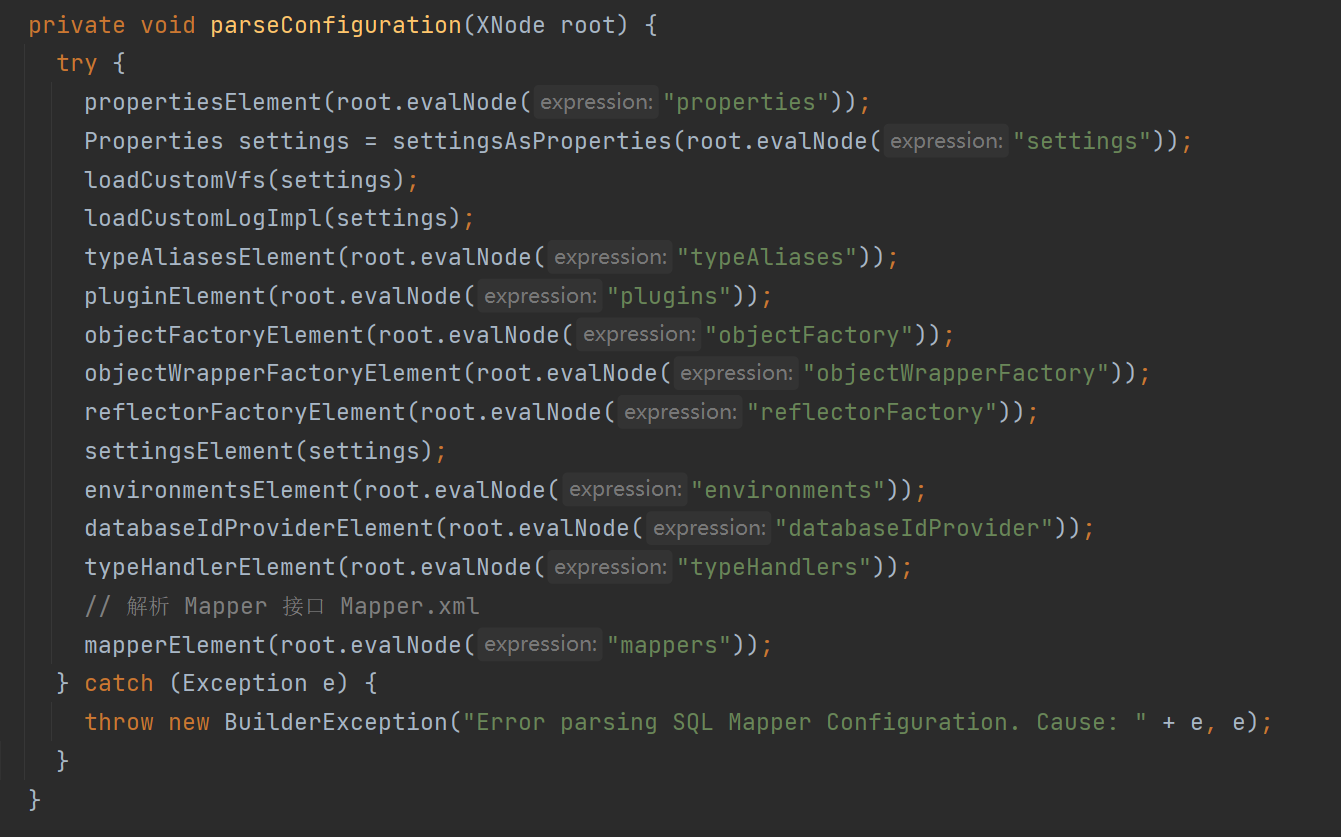
这就是 Mybatis 解析配置文件的顺序,可以看到整体还是很清晰的,每一个方法对应一个标签,接下来就是去分析每一个标签是怎么解析的做了些什么。
解析(properties)
<properties resource="jdbc.properties">
    <property name="username" value="admin1"/>
    <property name="password" value="1234"/>
</properties>
像上面的这种标签会被解析 Mybatis 成为一个 XNode 节点对象,在 propertiesElement 方法里面就会去解析这个节点对象属性值:
private void propertiesElement(XNode context) throws Exception {
  if (context != null) {
    // 解析properties节点内的 name value 属性封装成 Properties 对象
    // 即  <property name="username" value="admin1"/>
    //   <property name="password" value="1234"/>
    Properties defaults = context.getChildrenAsProperties();
    // 获取 properties 节点 resource 属性
    String resource = context.getStringAttribute("resource");
    //  获取 properties 节点 url 属性
    String url = context.getStringAttribute("url");
    // url 和 resource 只能指定一个,如果两个都设置了抛出异常
    if (resource != null && url != null) {
      throw new BuilderException("The properties element cannot specify both a URL and a resource based property file reference.  Please specify one or the other.");
    }
    if (resource != null) {
      // 将 resource 指定的 Properties 配置文件加载合并到 defaults Properties
      defaults.putAll(Resources.getResourceAsProperties(resource));
    } else if (url != null) {
      // 将 url 指定的 Properties 配置文件加载合并到 defaults Properties
      defaults.putAll(Resources.getUrlAsProperties(url));
    }
    // 获取 configuration 已存在的 Properties
    // 比方说你在 build 的方法参数传入了一个 Properties
    Properties vars = configuration.getVariables();
    if (vars != null) {
      // 如果有的话,合并到一起
      defaults.putAll(vars);
    }
    // 设置保存解析好的 Properties
    parser.setVariables(defaults);
    configuration.setVariables(defaults);
  }
}
首先会拿到 <properties> 标签下的所有 <property> 子标签,获取其 name 和 value 属性封装到一个 Properties 对象,然后再去检查你是否设置了外部的 properties 文件,可以是 url 或者 resource 类路径下,但是只能设置其中一个,如果两个都设置了的话,会抛出异常,得到路径以后会加载这个 properties 文件解析成 Properties 对象。
这里说一下这个配置类是在创建
XMLConfigBuilder对象的构造函数创建的,configuration作为XMLConfigBuilder对象的一个成员变量属性存在,而我们解析的配置文件所产生的对象,都会保存到configuration配置类里面。
接着会调用 configuration 配置类获取已经存在的 Properties 进行合并再次保存回 configuration 配置类,那么什么情况下 configuration 配置类会已经存在 Properties 了?如果你在 build 的方法传了一个 Properties 对象的话,因为你在 build 的方法传入的 Properties 实际是保存在了 configuration 配置类。
这一步主要的工作就是解析 <properties> 标签,然后获取这些键值对转换成 Properties 对象,最后保存到 configuration 配置类的 variables 属性。
解析(settings)
<settings>
    <!-- 是否开启驼峰命名自动映射 -->
  <setting name="mapUnderscoreToCamelCase" value="false"/>
</settings>
限于版面我就只列举了一个属性设置,完整的可以去 Mybatis 官网查看,有详细的结束。
private Properties settingsAsProperties(XNode context) {
  if (context == null) {
    return new Properties();
  }
  // 拿到 <settings> 标签下的所有子标签 <setting>
  // 并获取 <setting> 标签的 name value 属性转换成 Properties 对象
  Properties props = context.getChildrenAsProperties();
  // 解析配置类生成获取设置的成员变量属性
  MetaClass metaConfig = MetaClass.forClass(Configuration.class, localReflectorFactory);
  // 判断 <settings> 节点下的所有键是否是合法的
  for (Object key : props.keySet()) {
    if (!metaConfig.hasSetter(String.valueOf(key))) {
      // 如果你定义的键,在配置类找到对应的属性会抛异常
      throw new BuilderException("The setting " + key + " is not known.  Make sure you spelled it correctly (case sensitive).");
    }
  }
  return props;
}
首先会拿到 <settings> 标签下的所有子标签 <setting> ,然后获取子标签的 name 和 value 属性转换成 Properties 对象,接下来就会以 Configuration.class 以范本,去对解析到的子标签 <setting> name 属性做合法校验。
那它是怎么做的了?看个例子你就明白了:
public class Person {

    private String name;

    private Integer mobileNo;

    public String getName() {
        return name;
    }

    public Integer getMobileNo() {
        return mobileNo;
    }

    public void setName(String name) {
        this.name = name;
    }
}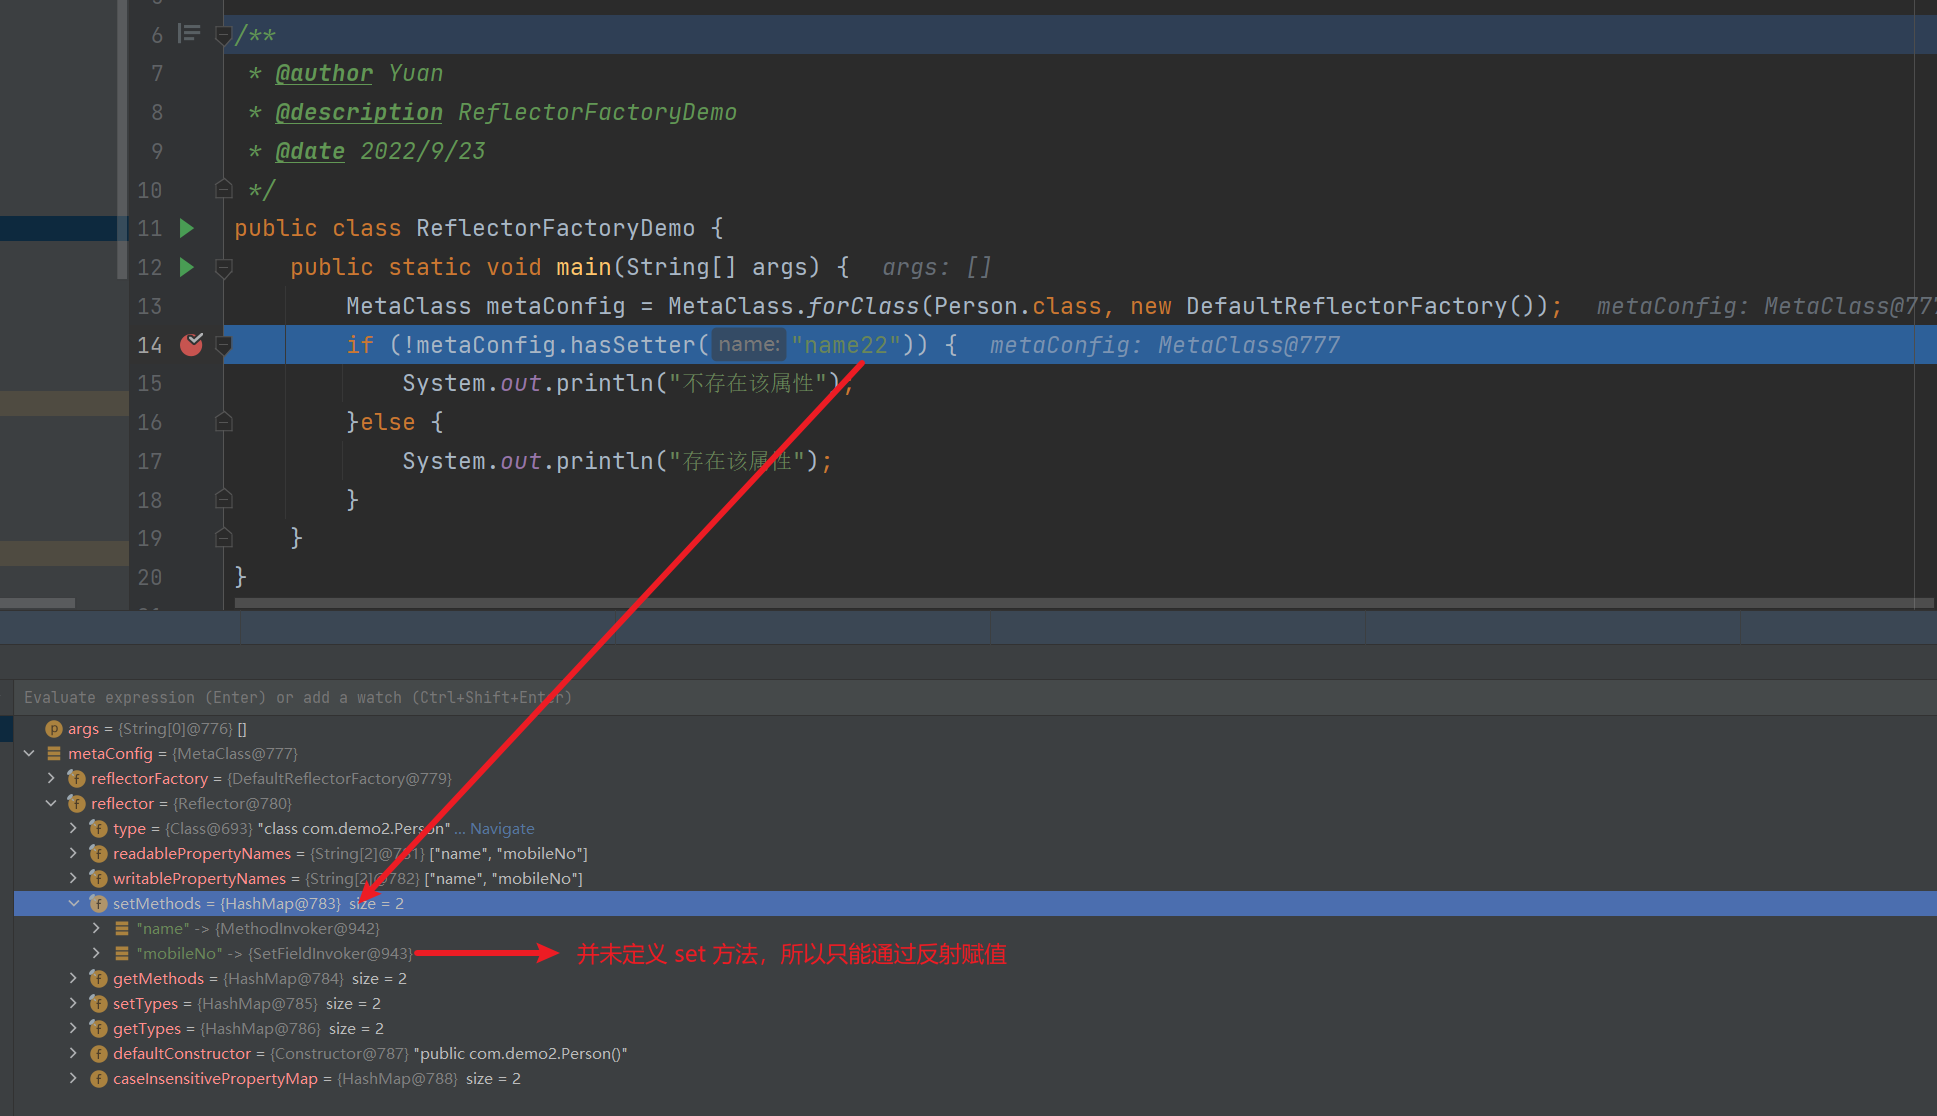
MetaClass.forClass 就是解析一个类的属性,并找到对应的 set 和 get 方法,对应没有 set 方法的属性,会通过反射的方式去赋值。所以如果我们在 <settings> 标签定义一个 configuration 配置类没有的属性,会抛出异常的。
<settings>
  <setting name="xxx" value="false"/>
</settings>
这一步主要是解析了 <settings> 标签,并将子标签定义的属性值封装成 Properties 对象,并以 Configuration.class 为范本校验了属性的合法性。
解析VFS和日志实现
// 加载 VFS 实现类
loadCustomVfs(settings);
// 加载日志实现类
loadCustomLogImpl(settings);
loadCustomVfs
<settings>
  <setting name="vfsImpl" value="org.mybatis.example.YourselfVfsImpl"/>
</settings>
private void loadCustomVfs(Properties props) throws ClassNotFoundException {
String value = props.getProperty("vfsImpl");
if (value != null) {
String[] clazzes = value.split(",");
for (String clazz : clazzes) {
if (!clazz.isEmpty()) {
@SuppressWarnings("unchecked")
Class<? extends VFS> vfsImpl = (Class<? extends VFS>)Resources.classForName(clazz);
configuration.setVfsImpl(vfsImpl);
}
}
}
}拿到上一步解析的 <settings> 标签键值对,检查是否有设置 vfsImpl 这个属性,没有设置的话直接跳过什么都不做,如果有的话会用 , 切割成数组,然后挨个加载。
loadCustomLogImpl
<settings>
  <setting name="logImpl" value="SLF4J | LOG4J | LOG4J2 | JDK_LOGGING | COMMONS_LOGGING | STDOUT_LOGGING | NO_LOGGING"/>
</settings>
private void loadCustomLogImpl(Properties props) {
Class<? extends Log> logImpl = resolveClass(props.getProperty("logImpl"));
configuration.setLogImpl(logImpl);
}首先拿到 logImpl 键所对应的实现类全限定类名,然后去加载 Class,再把这个 Class 保存到 configuration 配置类,在 setLogImpl 方法会去通过这个 Class 反射创建对象,确定 MyBatis 的日志对象。
解析(typeAliases)
<typeAliases>
  <typeAlias alias="user" type="com.demo2.modle.User"/>
  <package name="com.demo1.modle"/>
</typeAliases>
private void typeAliasesElement(XNode parent) {
if (parent != null) {
for (XNode child : parent.getChildren()) {
if ("package".equals(child.getName())) {
// 解析 <package name="com.demo1.modle"/>
String typeAliasPackage = child.getStringAttribute("name");
configuration.getTypeAliasRegistry().registerAliases(typeAliasPackage);
} else {
// 解析 <typeAlias alias="user" type="com.demo2.modle.User"/>
        String alias = child.getStringAttribute("alias");
        String type = child.getStringAttribute("type");
        try {
          Class<?> clazz = Resources.classForName(type);
          if (alias == null) {
            typeAliasRegistry.registerAlias(clazz);
          } else {
            typeAliasRegistry.registerAlias(alias, clazz);
          }
} catch (ClassNotFoundException e) {
throw new BuilderException("Error registering typeAlias for '" + alias + "'. Cause: " + e, e);
}
}
}
}
}在 <typeAliases> 标签可以定义两种类型别名注册的方式,一种是别名加类名,另外一种是直接指定包名,接下来就分析这种都是这么解析的。
解析(typeAlias)
// 解析 <typeAlias alias="user" type="com.demo2.modle.User"/>
String alias = child.getStringAttribute("alias");
String type = child.getStringAttribute("type");
try {
Class<?> clazz = Resources.classForName(type);
if (alias == null) {
typeAliasRegistry.registerAlias(clazz);
} else {
typeAliasRegistry.registerAlias(alias, clazz);
}对于这种解析单个类型别名的比较简单,直接拿到对应的属性键值对,首先将 type 属性指定的类名加载成为 Class,然后判断是否指定了别名 alias 属性,如果没有指定的话,那么就是下面这段逻辑:
// 没有指定 alias 别名
public void registerAlias(Class<?> type) {
  // com.demo.User => User
  String alias = type.getSimpleName();
  Alias aliasAnnotation = type.getAnnotation(Alias.class);
  if (aliasAnnotation != null) {
    alias = aliasAnnotation.value();
  }
  registerAlias(alias, type);
}
先获取简单类名,就是不包含的包名的类名,然后去尝试获取类型是否 @Alias 注解,如果有的话获取 value 属性,并覆盖了简单类名,最后调用 registerAlias 方法进行注册:
public void registerAlias(String alias, Class<?> value) {
  if (alias == null) {
    throw new TypeException("The parameter alias cannot be null");
  }

  // 转换为小写
  String key = alias.toLowerCase(Locale.ENGLISH);
  // 有存在的同样的 key,但是 value 不一样抛异常
  if (typeAliases.containsKey(key) && typeAliases.get(key) != null && !typeAliases.get(key).equals(value)) {
    throw new TypeException("The alias '" + alias + "' is already mapped to the value '" + typeAliases.get(key).getName() + "'.");
  }
  // 保存到 Map 集合
  typeAliases.put(key, value);
}
// TypeAliasRegistry 的成员变量
private final Map<String, Class<?>> typeAliases = new HashMap<>();
对应没有在 xml 配置文件指定 alias 属性的话,会先检查类上是否有 @Alias 注解,如果没有的话就使用简单类名转小写作为别名注册。而对于有指定别名的话,直接调用上面这个方法进行注册即可。
解析 (package)
// TypeAliasRegistry.registerAliases 其实调用的是
configuration.getTypeAliasRegistry().registerAliases(typeAliasPackage);

public void registerAliases(String packageName) {
    // 指定扫描的类父类是是谁
    registerAliases(packageName, Object.class);
  }

  // 注册所有扫描到符合规则的类
  public void registerAliases(String packageName, Class<?> superType) {
    ResolverUtil<Class<?>> resolverUtil = new ResolverUtil<>();
    // 根据包路径扫描所有的类
    resolverUtil.find(new ResolverUtil.IsA(superType), packageName);
    Set<Class<? extends Class<?>>> typeSet = resolverUtil.getClasses();
    for (Class<?> type : typeSet) {
      // 忽略内部类,接口,package-info.java
      if (!type.isAnonymousClass() && !type.isInterface() && !type.isMemberClass()) {
        // 相当于调用没有指定别名的方式去注册
        registerAlias(type);
      }
    }
  }
当我们指定别名注册是一个包名的时候,Mybatis 会帮我们扫描这个包下的所有类,但是会忽略内部类,接口,package-info.java,然后会调用那个没有别名的注册方法去注册,前面已经分析过了。
TypeAliasRegistry
TypeAliasRegistry 这个类主要负责别名的注册和管理,可以用于我们在写 SQL 语句的时候对应 resultType 的映射关系,如果你在这里注册的了话,比方说我们如果要返回一个集合其实 resultType 只需要填写 list 即可,那是因为 TypeAliasRegistry 这个类默认帮我们注册了 list 的映射关系。
public TypeAliasRegistry() {
  registerAlias("string", String.class);

  registerAlias("byte", Byte.class);
  registerAlias("char", Character.class);
  registerAlias("character", Character.class);
  registerAlias("long", Long.class);
  registerAlias("short", Short.class);
  registerAlias("int", Integer.class);
  registerAlias("integer", Integer.class);
  registerAlias("double", Double.class);
  registerAlias("float", Float.class);
  registerAlias("boolean", Boolean.class);

  registerAlias("byte[]", Byte[].class);
  registerAlias("char[]", Character[].class);
  registerAlias("character[]", Character[].class);
  registerAlias("long[]", Long[].class);
  registerAlias("short[]", Short[].class);
  registerAlias("int[]", Integer[].class);
  registerAlias("integer[]", Integer[].class);
  registerAlias("double[]", Double[].class);
  registerAlias("float[]", Float[].class);
  registerAlias("boolean[]", Boolean[].class);

  registerAlias("_byte", byte.class);
  registerAlias("_char", char.class);
  registerAlias("_character", char.class);
  registerAlias("_long", long.class);
  registerAlias("_short", short.class);
  registerAlias("_int", int.class);
  registerAlias("_integer", int.class);
  registerAlias("_double", double.class);
  registerAlias("_float", float.class);
  registerAlias("_boolean", boolean.class);

  registerAlias("_byte[]", byte[].class);
  registerAlias("_char[]", char[].class);
  registerAlias("_character[]", char[].class);
  registerAlias("_long[]", long[].class);
  registerAlias("_short[]", short[].class);
  registerAlias("_int[]", int[].class);
  registerAlias("_integer[]", int[].class);
  registerAlias("_double[]", double[].class);
  registerAlias("_float[]", float[].class);
  registerAlias("_boolean[]", boolean[].class);

  registerAlias("date", Date.class);
  registerAlias("decimal", BigDecimal.class);
  registerAlias("bigdecimal", BigDecimal.class);
  registerAlias("biginteger", BigInteger.class);
  registerAlias("object", Object.class);

  registerAlias("date[]", Date[].class);
  registerAlias("decimal[]", BigDecimal[].class);
  registerAlias("bigdecimal[]", BigDecimal[].class);
  registerAlias("biginteger[]", BigInteger[].class);
  registerAlias("object[]", Object[].class);

  registerAlias("map", Map.class);
  registerAlias("hashmap", HashMap.class);
  registerAlias("list", List.class);
  registerAlias("arraylist", ArrayList.class);
  registerAlias("collection", Collection.class);
  registerAlias("iterator", Iterator.class);

  registerAlias("ResultSet", ResultSet.class);
}
在 TypeAliasRegistry 的无参构造函数默认注册了这些别名映射关系。
解析(typeAliases)
<plugins>
    <plugin interceptor="com.demo1.plugin.ExamplePlugin">
        <property name="someProperty" value="100"/>
    </plugin>
</plugins>
private void pluginElement(XNode parent) throws Exception {
if (parent != null) {
for (XNode child : parent.getChildren()) {
String interceptor = child.getStringAttribute("interceptor");
// 获取 <plugin/> 下的 property
Properties properties = child.getChildrenAsProperties();
// 反射创建对象
Interceptor interceptorInstance = (Interceptor) resolveClass(interceptor).getDeclaredConstructor().newInstance();
// 设置获取到的 Properties
interceptorInstance.setProperties(properties);
// 添加到配置类
configuration.addInterceptor(interceptorInstance);
}
}
}首先获取 <plugins> 下的所有子标签 <plugin> ,先获取 interceptor 属性,然后获取子标签 <plugin> 下的所有 <property> 标签属性键值对,接着通过 interceptor 属性所指定的类名创建拦截器对象,然后调用 setProperties 属性注入你再配置文件定义的这些 <property> 标签属性键值对。
public interface Interceptor {

  Object intercept(Invocation invocation) throws Throwable;

  default Object plugin(Object target) {
    return Plugin.wrap(target, this);
  }

  default void setProperties(Properties properties) {
    // NOP
  }

}
Interceptor 是一个接口,如果你要成为一个拦截器对象的话,必须实现这个接口,主要是在执行 SQL 的时候会有一些扩展点可以使用拦截器的方式扩展,这里先不具体展开讲,待到分析 SQL 执行的时候在分析。
解析(objectFactory)
<objectFactory type="com.demo1.factory.ExampleObjectFactory">
    <property name="someProperty" value="100"/>
</objectFactory>
public interface ObjectFactory {
/**
* 设置一些属性配置
*/
default void setProperties(Properties properties) {
}
/**
* 使用无参构造创建对象
*/
<T> T create(Class<T> type);
/**
* 使用有参构造创建对象
*/
<T> T create(Class<T> type, List<Class<?>> constructorArgTypes, List<Object> constructorArgs);
/**
* 判断是不是一个集合类型
*/
<T> boolean isCollection(Class<T> type);
}首先如果你要注册一个 objectFactory 的话,必须实现一个 ObjectFactory 接口,那么注册这个类可以用来干嘛了,主要用来创建对象,如果你有自定义创建对象的需求,那么你就可以注册一个 ObjectFactory 。
// <objectFactory> 标签
private void objectFactoryElement(XNode context) throws Exception {
  if (context != null) {
    String type = context.getStringAttribute("type");
    Properties properties = context.getChildrenAsProperties();
    // 反射创建对象
    ObjectFactory factory = (ObjectFactory) resolveClass(type).getDeclaredConstructor().newInstance();
    // 设置解析 property 解析到的 Properties
    factory.setProperties(properties);
    configuration.setObjectFactory(factory);
  }
}
解析(objectWrapperFactory)
<objectWrapperFactory type="com.demo1.wrapper.ExampleObjectWrapperFactory"/>public interface ObjectWrapperFactory {
// 对象是否需要加工
boolean hasWrapperFor(Object object);
// 获取一个 ObjectWrapper 对象
ObjectWrapper getWrapperFor(MetaObject metaObject, Object object);
}要成为一个 objectWrapperFactory 需要实现上面的 ObjectWrapperFactory 接口,主要作用就是返回一个 ObjectWrapper ,而 ObjectWrapper 又是拿来干嘛的了?它是对对象的包装,可以通过字符串操作和查询对象的属性,属于装饰器模式的一种。
public interface ObjectWrapper {

  /**
   * 获取指定的属性
   * 如果封装的是普通的 Bean  对象,则调用对应的 get 方法
   * 如果封装的是集合对象,则返回对应下标的 value
   * 如果封装的是 Map 对象,则返回 key 对应的 value
   */
  Object get(PropertyTokenizer prop);

  /**
   * 设置指定的属性值
   * 如果封装的是普通的 Bean  对象,则调用对应的 set 方法
   * 如果封装的是集合对象,则设置对应下标的 value
   * 如果封装的是 Map 对象,则设置 key 对应的 value
   */
  void set(PropertyTokenizer prop, Object value);

  /**
   * 查找属性表达式指定的属性
   * useCamelCaseMapping 表示是否忽略表达式中的下划线
   */
  String findProperty(String name, boolean useCamelCaseMapping);

  /**
   * 获取可读属性的名称集合
   */
  String[] getGetterNames();

  /**
   * 获取可写属性的名称集合
   */
  String[] getSetterNames();

  /**
   * 解析属性表达式指定的属性对应的 set 方法的参数类型
   */
  Class<?> getSetterType(String name);

  /**
   * 解析属性表达式指定的属性对应的 get 方法的返回值
   */
  Class<?> getGetterType(String name);

  /**
   * 判断属性表达式指定属性是否有set方法
   */
  boolean hasSetter(String name);

  /**
   * 判断属性表达式指定属性是否有get方法
   */
  boolean hasGetter(String name);

  /**
   * 为属性表达式指定的属性创建相应的 MetaObject 对象
   */
  MetaObject instantiatePropertyValue(String name, PropertyTokenizer prop, ObjectFactory objectFactory);

  /**
   * 判断封装对象是否是集合
   */
  boolean isCollection();

  /**
   * 向集合中添加元素,调用 Collection.add 方法
   */
  void add(Object element);

  /**
   * 向集合中添加一批元素,调用 Collection.addAll 方法
   */
  <E> void addAll(List<E> element);

}
// 解析 <objectWrapperFactory> 标签
private void objectWrapperFactoryElement(XNode context) throws Exception {
if (context != null) {
String type = context.getStringAttribute("type");
// 反射创建对象
ObjectWrapperFactory factory = (ObjectWrapperFactory) resolveClass(type).getDeclaredConstructor().newInstance();
configuration.setObjectWrapperFactory(factory);
}
}解析(reflectorFactory)
<reflectorFactory type="com.demo1.reflector.ExampleReflectorFactory"/>public interface ReflectorFactory {
/**
* 是否开启解析缓存
* @return
*/
boolean isClassCacheEnabled();
/**
* 设置是否开启解析缓存
* @param classCacheEnabled
*/
void setClassCacheEnabled(boolean classCacheEnabled);
/**
* 给定一个 Class 返回一个 Reflector 接口类型
* @param type
* @return
*/
Reflector findForClass(Class<?> type);
}首先还是要实现上面这个接口才能注册成为一个 reflectorFactory ,如果你还记得我们在上面分析解析 <settings> 验证其属性合法性的时候,其实是调用这个工厂类去解析的。
其实这个三个 Factory 一般来说我们都不会注册替换,所以只需要有了解有这么个扩展就好啦,如果将来真的有这方面的定制化需求,不妨再来了解一下这三个 Factory 实现,这里稍微总结一下这三个 Factory 接口都是用来做什么的:
- ObjectFactory:每次 MyBatis 创建结果对象的新实例时,它都会使用对象工厂(ObjectFactory)来完成实例化工作,如果你想在创建结果对象是做一些自定义操作,就可以考虑注册自己的 ObjectFactory 实现类来覆盖 Mybatis 默认的。
- ObjectWrapperFactory:他用于将普通的 JAVA 对象包装成 ObjectWrapper 对象。在这里我将 ObjectWrapper 叫做对象包装器,因为 ObjectWrapper 对象的作用就是包装对象后为其提供统一的属性操作方法。
- ReflectorFactory:用于生成 Reflector 对象的工厂类,但是笔者看源码发现 Reflector 并发接口或者抽象类,如果想实现自定义只能使用继承了。
settings标签属性赋值
private void settingsElement(Properties props) {
  configuration.setAutoMappingBehavior(AutoMappingBehavior.valueOf(props.getProperty("autoMappingBehavior", "PARTIAL")));
  configuration.setAutoMappingUnknownColumnBehavior(AutoMappingUnknownColumnBehavior.valueOf(props.getProperty("autoMappingUnknownColumnBehavior", "NONE")));
  configuration.setCacheEnabled(booleanValueOf(props.getProperty("cacheEnabled"), true));
  configuration.setProxyFactory((ProxyFactory) createInstance(props.getProperty("proxyFactory")));
  configuration.setLazyLoadingEnabled(booleanValueOf(props.getProperty("lazyLoadingEnabled"), false));
  configuration.setAggressiveLazyLoading(booleanValueOf(props.getProperty("aggressiveLazyLoading"), false));
  configuration.setMultipleResultSetsEnabled(booleanValueOf(props.getProperty("multipleResultSetsEnabled"), true));
  configuration.setUseColumnLabel(booleanValueOf(props.getProperty("useColumnLabel"), true));
  configuration.setUseGeneratedKeys(booleanValueOf(props.getProperty("useGeneratedKeys"), false));
  configuration.setDefaultExecutorType(ExecutorType.valueOf(props.getProperty("defaultExecutorType", "SIMPLE")));
  configuration.setDefaultStatementTimeout(integerValueOf(props.getProperty("defaultStatementTimeout"), null));
  configuration.setDefaultFetchSize(integerValueOf(props.getProperty("defaultFetchSize"), null));
  configuration.setDefaultResultSetType(resolveResultSetType(props.getProperty("defaultResultSetType")));
  configuration.setMapUnderscoreToCamelCase(booleanValueOf(props.getProperty("mapUnderscoreToCamelCase"), false));
  configuration.setSafeRowBoundsEnabled(booleanValueOf(props.getProperty("safeRowBoundsEnabled"), false));
  configuration.setLocalCacheScope(LocalCacheScope.valueOf(props.getProperty("localCacheScope", "SESSION")));
  configuration.setJdbcTypeForNull(JdbcType.valueOf(props.getProperty("jdbcTypeForNull", "OTHER")));
  configuration.setLazyLoadTriggerMethods(stringSetValueOf(props.getProperty("lazyLoadTriggerMethods"), "equals,clone,hashCode,toString"));
  configuration.setSafeResultHandlerEnabled(booleanValueOf(props.getProperty("safeResultHandlerEnabled"), true));
  configuration.setDefaultScriptingLanguage(resolveClass(props.getProperty("defaultScriptingLanguage")));
  configuration.setDefaultEnumTypeHandler(resolveClass(props.getProperty("defaultEnumTypeHandler")));
  configuration.setCallSettersOnNulls(booleanValueOf(props.getProperty("callSettersOnNulls"), false));
  configuration.setUseActualParamName(booleanValueOf(props.getProperty("useActualParamName"), true));
  configuration.setReturnInstanceForEmptyRow(booleanValueOf(props.getProperty("returnInstanceForEmptyRow"), false));
  configuration.setLogPrefix(props.getProperty("logPrefix"));
  configuration.setConfigurationFactory(resolveClass(props.getProperty("configurationFactory")));
  configuration.setShrinkWhitespacesInSql(booleanValueOf(props.getProperty("shrinkWhitespacesInSql"), false));
  configuration.setArgNameBasedConstructorAutoMapping(booleanValueOf(props.getProperty("argNameBasedConstructorAutoMapping"), false));
  configuration.setDefaultSqlProviderType(resolveClass(props.getProperty("defaultSqlProviderType")));
  configuration.setNullableOnForEach(booleanValueOf(props.getProperty("nullableOnForEach"), false));
}
这一步就是将 <settings> 标签解析到的属性值赋值到 configuration 配置类,然后默认值的提供实现也是在这里处理的。
解析(environments)
<environments default="dev">
    <environment id="sit">
        <transactionManager type="JDBC"/>
        <dataSource type="POOLED">
            <property name="driver" value="${jdbc.driverClass}"/>
            <property name="url" value="${jdbc.jdbcUrl}"/>
            <property name="username" value="${jdbc.user}"/>
            <property name="password" value="${jdbc.password}"/>
        </dataSource>
    </environment>
    <environment id="dev">
        <transactionManager type="JDBC"/>
        <dataSource type="POOLED">
            <property name="driver" value="${jdbc.driverClass}"/>
            <property name="url" value="${jdbc.jdbcUrl}"/>
            <property name="username" value="${jdbc.user}"/>
            <property name="password" value="${jdbc.password}"/>
        </dataSource>
    </environment>
</environments>
在上面我提供了两组数据源,通过 <environment> 标签的 id 去区分分组,另外在 <environments> 标签的属性可以指定一个 default 属性,来默认指定使用那个数据源。
private void environmentsElement(XNode context) throws Exception {
  if (context != null) {
    // 先检查 build 时是否指定 environment
    if (environment == null) {
      // 没有指定的话,获取 <environments> 标签的 default 属性
      environment = context.getStringAttribute("default");
    }
    for (XNode child : context.getChildren()) {
      String id = child.getStringAttribute("id");
      // 检查当前遍历的 <environment> 标签 id 属性是否与 environment 一致
      if (isSpecifiedEnvironment(id)) {
        TransactionFactory txFactory = transactionManagerElement(child.evalNode("transactionManager"));
        DataSourceFactory dsFactory = dataSourceElement(child.evalNode("dataSource"));
        DataSource dataSource = dsFactory.getDataSource();
        Environment.Builder environmentBuilder = new Environment.Builder(id)
            .transactionFactory(txFactory)
            .dataSource(dataSource);
        configuration.setEnvironment(environmentBuilder.build());
        break;
      }
    }
  }
}
首先确定查看你再 build 方法时有没有指定 environment ,如果没有的话就获取配置文件默认的。然后遍历所有的 <environment> 标签,获取 id 与当前的 environment 进行匹配,如果匹配上了,就进一步解析 <transactionManager> 和 <dataSource> 标签。至于这两个标签的是怎么解析的就不展开讲了,其实就是去 TypeAliasRegistry 找对应的注册类,然后反射创建对象。
解析(databaseIdProvider)
<databaseIdProvider type="DB_VENDOR">
    <property name="MySQL" value="mysql"/>
    <property name="Microsoft SQL Server" value="ms" />
</databaseIdProvider>
定义了这个标签,可以根据不同的数据库厂商执行不同的语句,因为有些 SQL 语句不同的数据库厂商实现不一样,Mybatis 可以根据你当前使用的数据源识,然后根据 databaseId 从而选择正确的 SQL 语句去执行。
<select id="select" resultType="user" databaseId="mysql">
    mysql 的 SQL 语句实现
</select>

<select id="select" resultType="user" databaseId="ms">
    Microsoft SQL Server 的 SQL 语句实现
</select>
而 <property> 主要是起到一个别名映射的效果,类似于这种 Microsoft SQL Server 太长了,可以起个别名简短一点。
private void databaseIdProviderElement(XNode context) throws Exception {
  DatabaseIdProvider databaseIdProvider = null;
  if (context != null) {
    String type = context.getStringAttribute("type");
    // 早期版本的向后兼容
    if ("VENDOR".equals(type)) {
      type = "DB_VENDOR";
    }
    // 解析 <databaseIdProvider> 标签
    Properties properties = context.getChildrenAsProperties();
    databaseIdProvider = (DatabaseIdProvider) resolveClass(type).getDeclaredConstructor().newInstance();
    databaseIdProvider.setProperties(properties);
  }
  // 获取环境变量对象
  Environment environment = configuration.getEnvironment();
  if (environment != null && databaseIdProvider != null) {
    // 根据 DataSource 确定现在到底使用的什么数据库
    String databaseId = databaseIdProvider.getDatabaseId(environment.getDataSource());
    configuration.setDatabaseId(databaseId);
  }
}
解析(mappers)
<mappers>
  <!-- 使用相对于类路径的资源引用 -->
  <mapper resource="org/mybatis/builder/AuthorMapper.xml"/>
  <!-- 使用完全限定资源定位符(URL) -->
  <mapper url="file:///var/mappers/AuthorMapper.xml"/>
  <!-- 使用映射器接口实现类的完全限定类名 -->
  <mapper class="org.mybatis.builder.AuthorMapper"/>
  <!-- 将包内的映射器接口全部注册为映射器 -->
  <package name="org.mybatis.builder"/>
</mappers>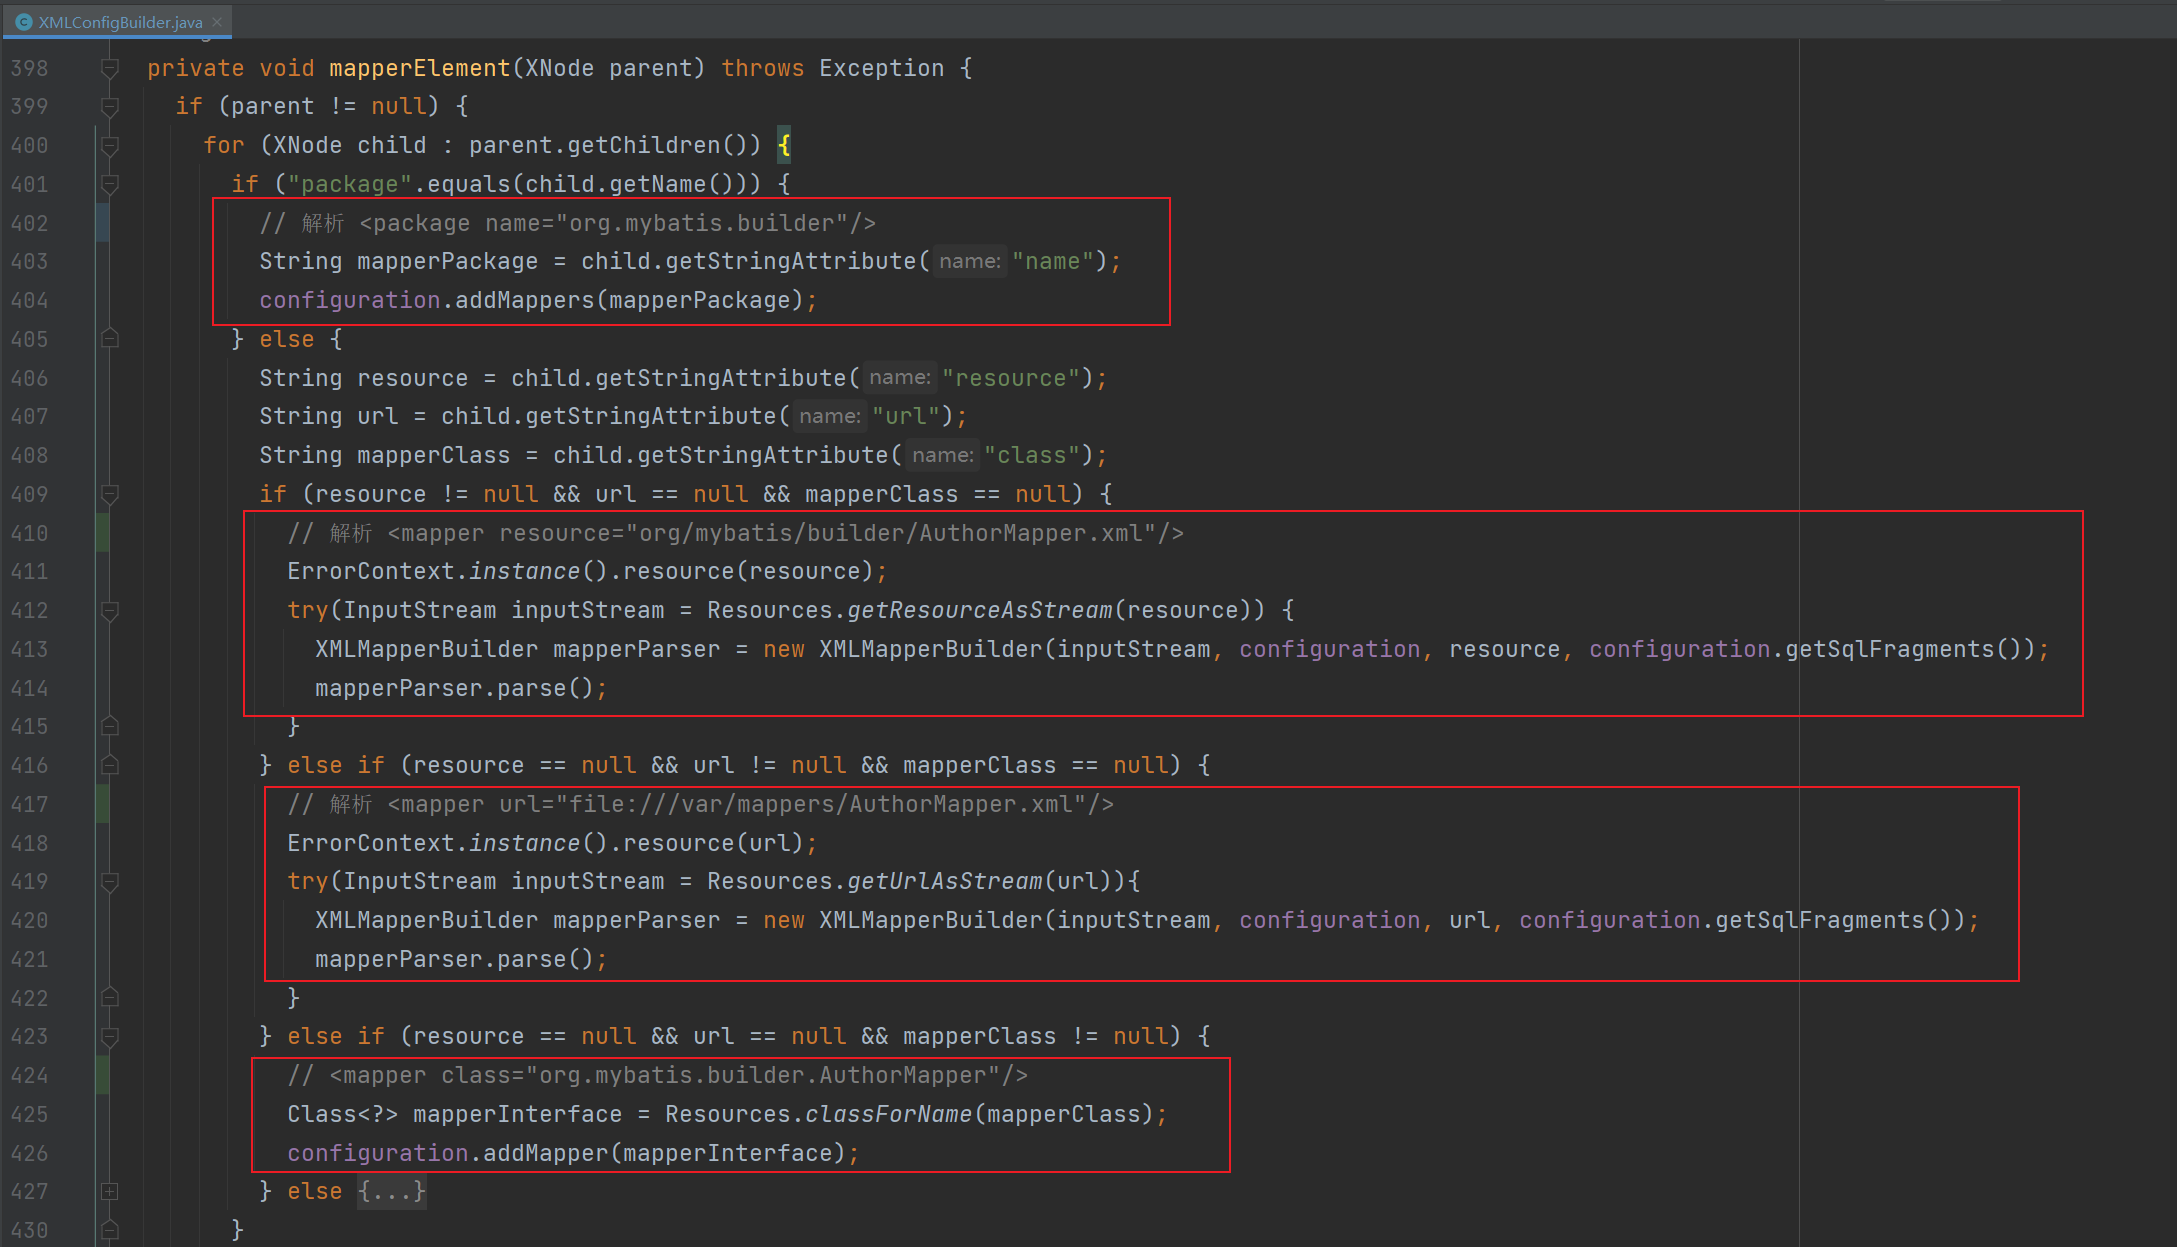
这里以配置 <package> 标签为例子分析,首先会拿到标签的 name 属性作为包名,接着调用配置类的 addMappers 方法。
public void addMappers(String packageName, Class<?> superType) {
  // 获取所有的 class 文件
  ResolverUtil<Class<?>> resolverUtil = new ResolverUtil<>();
  resolverUtil.find(new ResolverUtil.IsA(superType), packageName);
  Set<Class<? extends Class<?>>> mapperSet = resolverUtil.getClasses();
  // 遍历获取到的所有 class 文件
  for (Class<?> mapperClass : mapperSet) {
    addMapper(mapperClass);
  }
}
接着调用 MapperRegistry 类的 addMapper 方法去解析 Mapper 接口:
public <T> void addMapper(Class<T> type) {
  // 判断 class 文件是否为一个接口
  if (type.isInterface()) {
    // 判断 class 是否已经存在
    if (hasMapper(type)) {
      throw new BindingException("Type " + type + " is already known to the MapperRegistry.");
    }
    boolean loadCompleted = false;
    try {
      // 把 Mapper 接口封装到 MapperProxyFactory 工厂类
      // 当调用 getMapper 获取一个对象的时候就会从这里获取
      knownMappers.put(type, new MapperProxyFactory<>(type));
      // 解析器对象
      MapperAnnotationBuilder parser = new MapperAnnotationBuilder(config, type);
      parser.parse();
      loadCompleted = true;
    } finally {
      if (!loadCompleted) {
        knownMappers.remove(type);
      }
    }
  }
}
接下来主要看 MapperAnnotationBuilder 的 parse 方法:
public void parse() {
  // interface com.demo.mapper.UserMapper
  String resource = type.toString();
  // 判断是否已经解析过
  if (!configuration.isResourceLoaded(resource)) {
    // 解析 Mapper接口对应的 xml 文件
    loadXmlResource();
    // 添加进集合表示已经解析过了
    configuration.addLoadedResource(resource);
    // 设置当前的命名空间
    assistant.setCurrentNamespace(type.getName());
    // 解析 @CacheNamespace 注解
    parseCache();
    // 解析 CacheNamespaceRef 注解
    parseCacheRef();
    for (Method method : type.getMethods()) {
      // 判断是不是桥接方法或接口的 default 方法
      if (!canHaveStatement(method)) {
        continue;
      }
      // 处理 @Select @SelectProvider 注解
      if (getAnnotationWrapper(method, false, Select.class, SelectProvider.class).isPresent()
          && method.getAnnotation(ResultMap.class) == null) {
        // 处理结果返回值映射
        parseResultMap(method);
      }
      try {
        // 处理 @Select @Update @Insert @Delete @SelectProvider @UpdateProvider
        //  @InsertProvider.class, @DeleteProvider.class 注解
        parseStatement(method);
      } catch (IncompleteElementException e) {
        configuration.addIncompleteMethod(new MethodResolver(this, method));
      }
    }
  }
  // 解析未处理的方法
  parsePendingMethods();
}
Mybatis — Sep 22, 2022