从源码角度分析SpirngMVC启动流程
本文基于 JavaConfig 的配置方式去从源码角度跟踪分析我们的 Spring 容器,是怎么被 Servlet 容器加载启动的,在启动的过程中都做了哪些?以及所谓的父子容器是怎么去做关联的。
SPI机制
在分析 SpringMvc 启动前,先介绍一下SPI 全称为 (Service Provider Interface) ,是 JDK 内置的一种服务提供发现机制。SPI 是一种动态替换发现的机制, 比如有个接口,想运行时动态的给它添加实现,你只需要在约定的配置文件添加实现类。如果你了解 SpringBoot 的自动配置,其实它也是一种基于 SPI 机制的思想,不过没有使用 JDK 提供的这一套而是自己实现的。
看一个例子你就能更加明白是干嘛的了?
// 接口
public interface UserService {
   void delete();
}

// 实现类
public class UserServiceImplA implements UserService{
	@Override
	public void delete() {
		System.out.println("UserServiceImplA delete()");
	}
}

public class SPIDemo {
	public static void main(String[] args) {
		ServiceLoader<UserService> load = ServiceLoader.load(UserService.class);
		for (UserService userService : load) {
			userService.delete();
		}
	}
}
ServiceLoader.load 是 JDK 内置的 SPI 机制实现,你只需要在类路径下定义 META-INF/services/com.demo1.UserService 新建一个文件,然后在文件里面填写该接口的实现全限定类名,ServiceLoader.load 就会将其实现类找到并返回给你。而 SpringMvc 就是借用这种 SPI 机制来与 Servlet 容器整合实现配置加载创建容器。
ServletContainerInitializer
在 Servlet 3.0 规范中新增加了一个基于 SPI 机制的接口
public interface ServletContainerInitializer {

  	// Set<Class<?>> c 可以使用 @HandlesTypes 订阅你感兴趣的类
    // Servlet 容器会负责找到这些类并传给你
    public void onStartup(Set<Class<?>> c, ServletContext ctx)
        throws ServletException;
}
你需要在类路径下 META-INF/services/javax.servlet.ServletContainerInitializer 新建一个这样的文件,然后文件里填写你的实现类,那么 Servlet 容器在启动的时候就会使用 SPI 机制找到你的实现类并实例化,然后回调这个 onStartup 方法,并将当前的你感兴趣的类,已经当前 Servlet 容器上下文对象传递给你。
SpringMvc 就是基于这种机制实现了了 ServletContainerInitializer 接口,然后让 Servlet 容器回调 onStartup 方法来借此加载自己的 Spring 容器。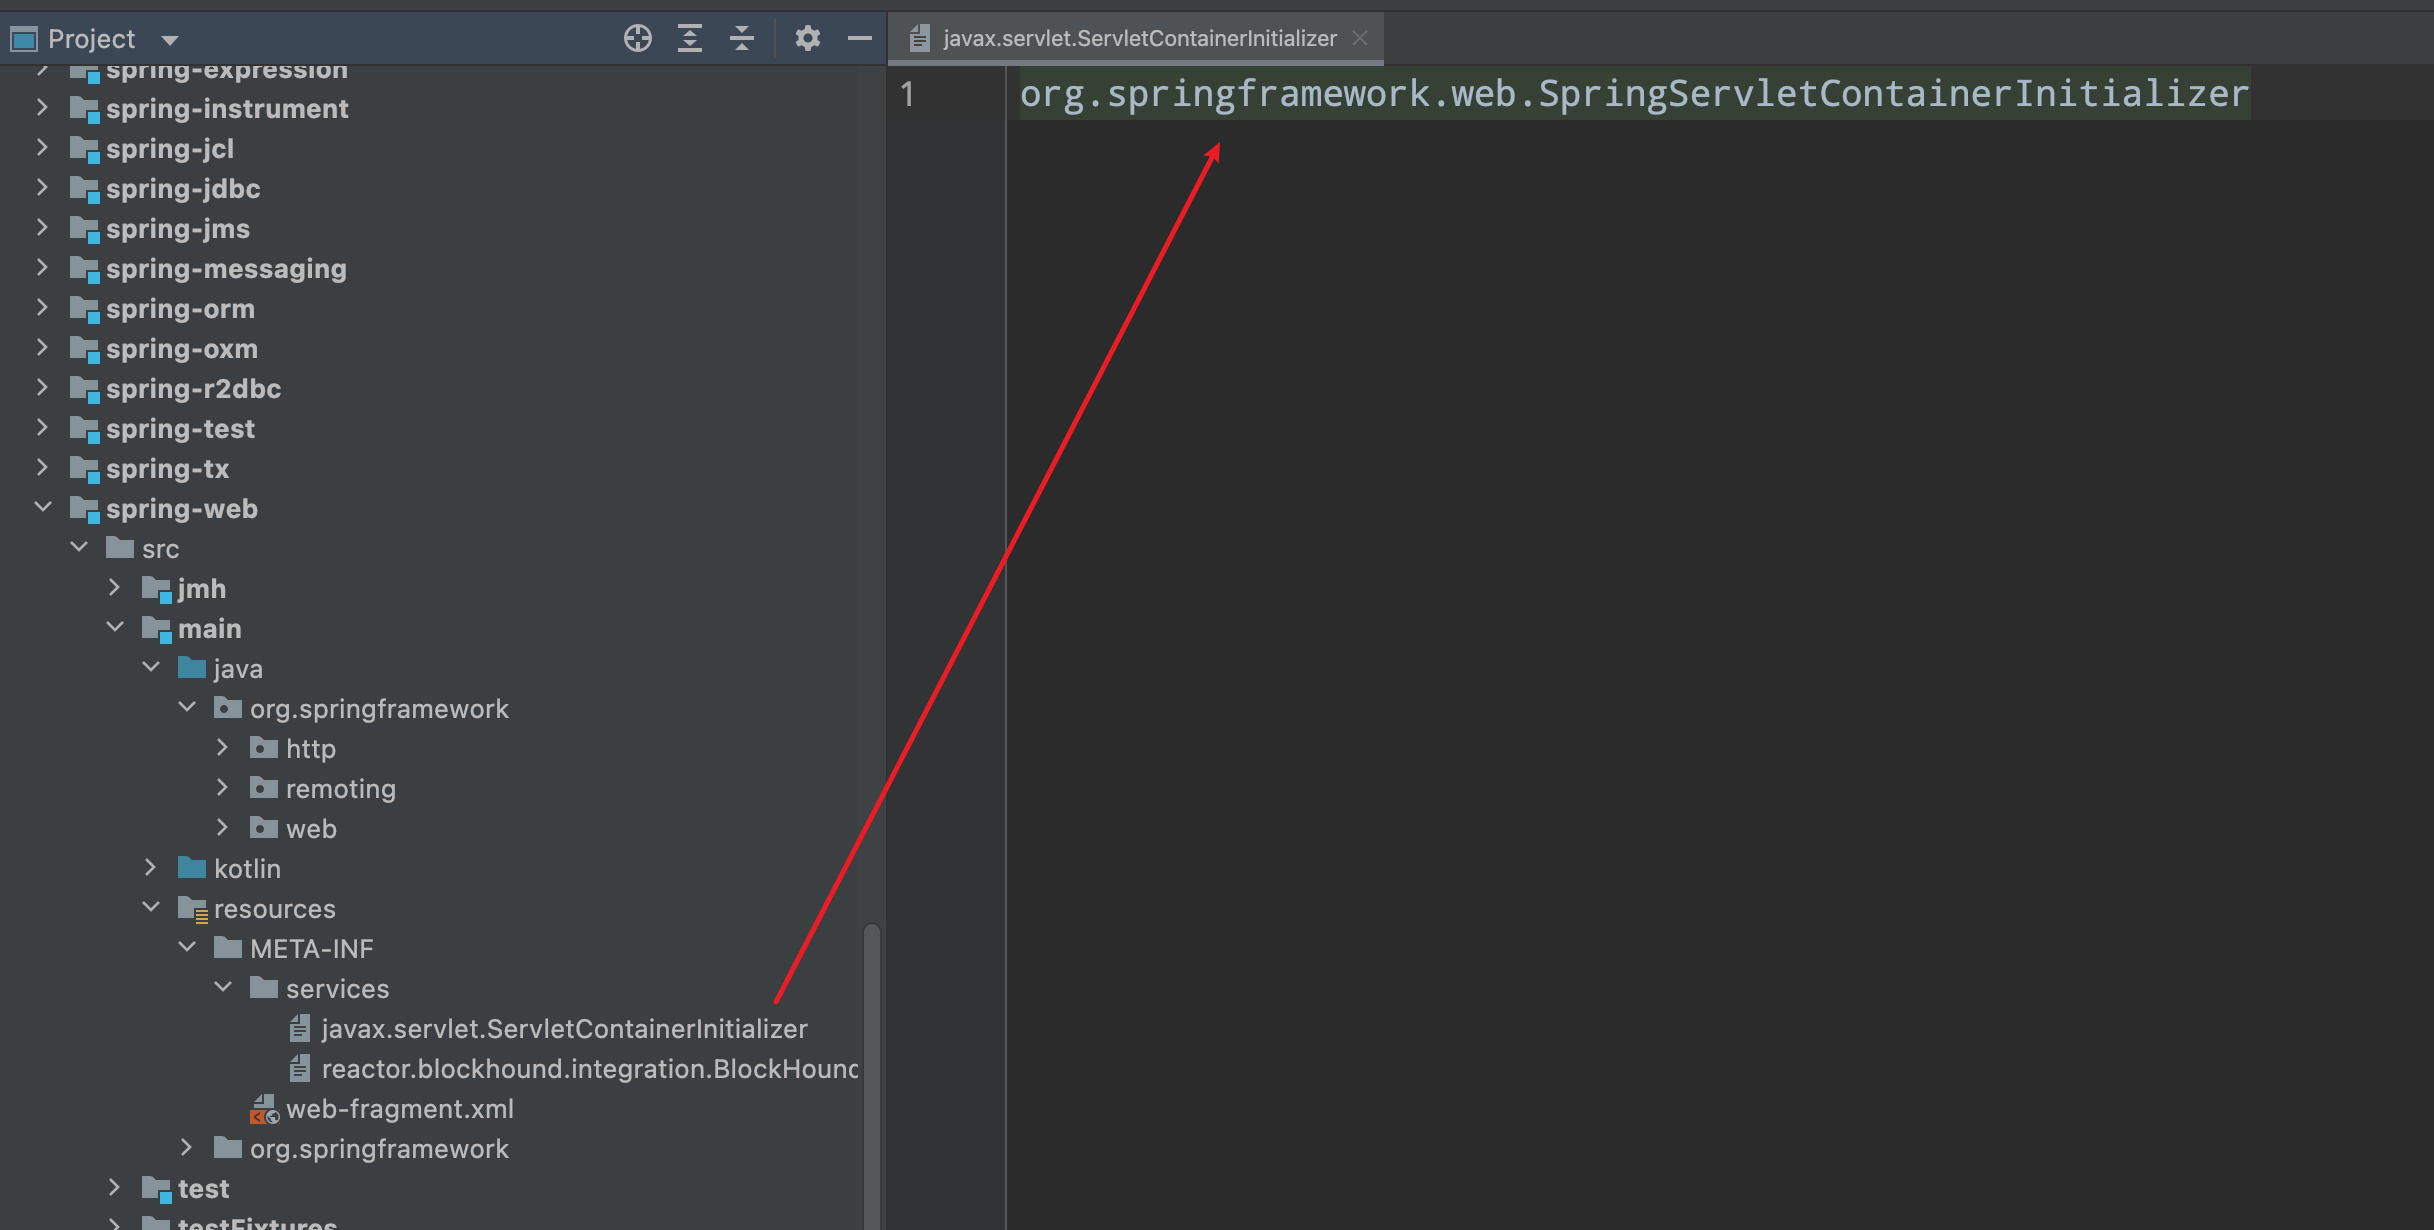
可以在看到在 Spring-web 模块下就定义了一个 ServletContainerInitializer 接口的实现类,接下来我们就从这个类开始入手分析是怎么去创建我们的 Web 容器的。
SpringServletContainerInitializer
我们先看一下 @HandlesTypes 注解,它订阅的是一个 WebApplicationInitializer 接口,所以 Servlet 容器会找到所有 WebApplicationInitializer 接口的实现类然后传递进来。
// 这是 Spring 定义的接口
public interface WebApplicationInitializer {

   void onStartup(ServletContext servletContext) throws ServletException;

}
如果使用过基于 JavaConfig 的方式来实现 SSM 框架的整合,那么你一定应该写过这样一个配置类:
public class MyWebAppInitializer  extends AbstractAnnotationConfigDispatcherServletInitializer{

   /**
    * 父容器配置类
    */
   @Override
   protected Class<?>[] getRootConfigClasses() {
      return new Class[]{RootConfig.class};
   }

   /**
    * 子容器配置类
    */
   @Override
   protected Class<?>[] getServletConfigClasses() {
      return new Class[]{WebConfig.class};
   }

   /**
    * DispatchServlet 路径映射
    */
   @Override
   protected String[] getServletMappings() {
      return new String[]{"/"};
   }
}
那这和我们的 WebApplicationInitializer 有什么关系了?看一下我们自己定义配置类 MyWebAppInitializer 继承结构你就明白了:
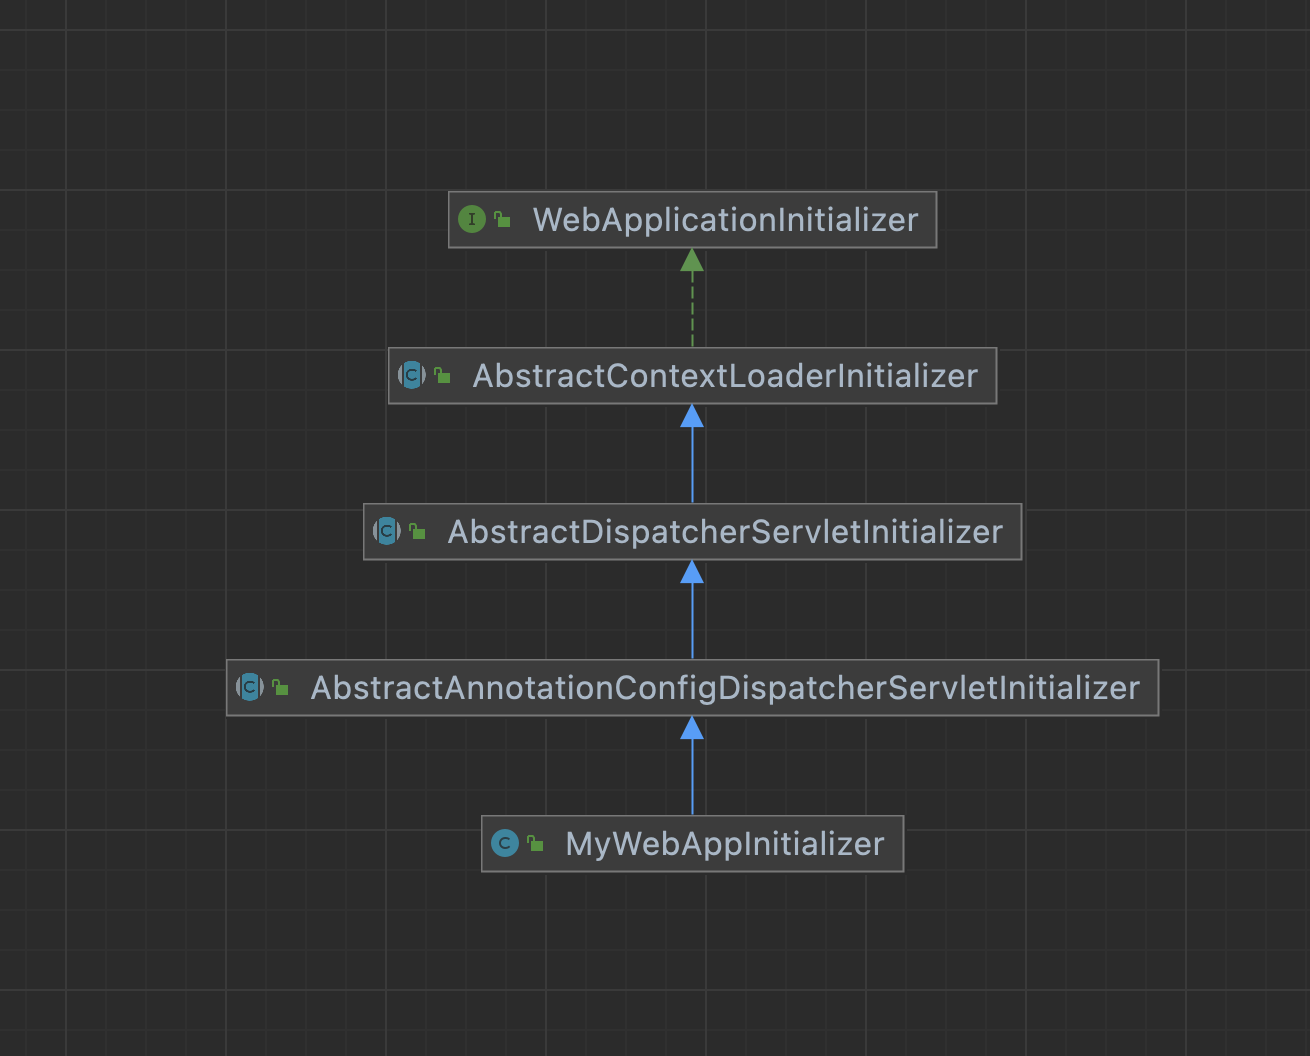
看到这里你应该明白了,我们定义的配置类,会被 Servlet 容器扫描到,然后作为参数传递给 SpringServletContainerInitializer 类的 onStartup 方法,最后然后会去调用我们自己定义的配置类的 onStartup 方法,注意这两个 onStartup 方法别搞混了。那么我们在定义配置类的时候,并没有实现 onStartup 方法啊,我们没有实现,那是因为上面的这些抽象父类已经帮我们做了绝大部分的事。
创建父子容器
创建父容器
我们跟踪这个回调的 onStartup 方法会先进入到 AbstractDispatcherServletInitializer 定义的 onStartup 方法:
// AbstractDispatcherServletInitializer 类的
public void onStartup(ServletContext servletContext) throws ServletException {
   // 创建父容器
   super.onStartup(servletContext);
   // 创建子容器,并注册 DispatcherServlet 到 Servlet 容器
   registerDispatcherServlet(servletContext);
}
AbstractDispatcherServletInitializer 类首先调用了父类 AbstractContextLoaderInitializer 的 onStartup 方法,我们先分析看是怎么创建父容器的:
// AbstractContextLoaderInitializer 类的
public void onStartup(ServletContext servletContext) throws ServletException {
   // 创建父容器和 ContextLoaderListener 对象添加到 servletContext
   registerContextLoaderListener(servletContext);
}

protected void registerContextLoaderListener(ServletContext servletContext) {
		// 创建父容器
		WebApplicationContext rootAppContext = createRootApplicationContext();
		if (rootAppContext != null) {
			// 创建 ServletContextListener
			ContextLoaderListener listener = new ContextLoaderListener(rootAppContext);
			listener.setContextInitializers(getRootApplicationContextInitializers());
			// 将其添加到 Servlet 容器,以便在 Servlet 容器初始化回调
			servletContext.addListener(listener);
		}
		else {
			logger.debug("No ContextLoaderListener registered, as " +
					"createRootApplicationContext() did not return an application context");
		}
	}
在 AbstractContextLoaderInitializer 创建父容器是调用的 createRootApplicationContext() 去创建的,而这个方法是由子类 AbstractAnnotationConfigDispatcherServletInitializer 实现创建的
// AbstractAnnotationConfigDispatcherServletInitializer 类的
protected WebApplicationContext createRootApplicationContext() {
   // 调用我们子类实现的 getRootConfigClasses,获取父容器的配置类
   Class<?>[] configClasses = getRootConfigClasses();
   if (!ObjectUtils.isEmpty(configClasses)) {
      AnnotationConfigWebApplicationContext context = new AnnotationConfigWebApplicationContext();
      context.register(configClasses);
      // 注意这里并未刷新父容器,只是将配置类注册进了父容器
      return context;
   }
   else {
      // 如果没有配置类的话,不会创建父容器
      return null;
   }
}
看到这个 getRootConfigClasses() 你是不是有点眼熟,对没错就是调用的我们自己定义的 MyWebAppInitializer 配置类去获取父容器的配置类,从而去创建父容器,到这里我们的父容器就创建完毕了,但此时并没有去刷新容器,那这容器肯定还是无法使用的,那么在那里刷新的了,这就与我们创建的 ContextLoaderListener 对象有关了,这里先不展开讲,先把子容器的创建也分析完,再来讲容器的初始化刷新。
创建子容器
// AbstractDispatcherServletInitializer 类的
protected void registerDispatcherServlet(ServletContext servletContext) {
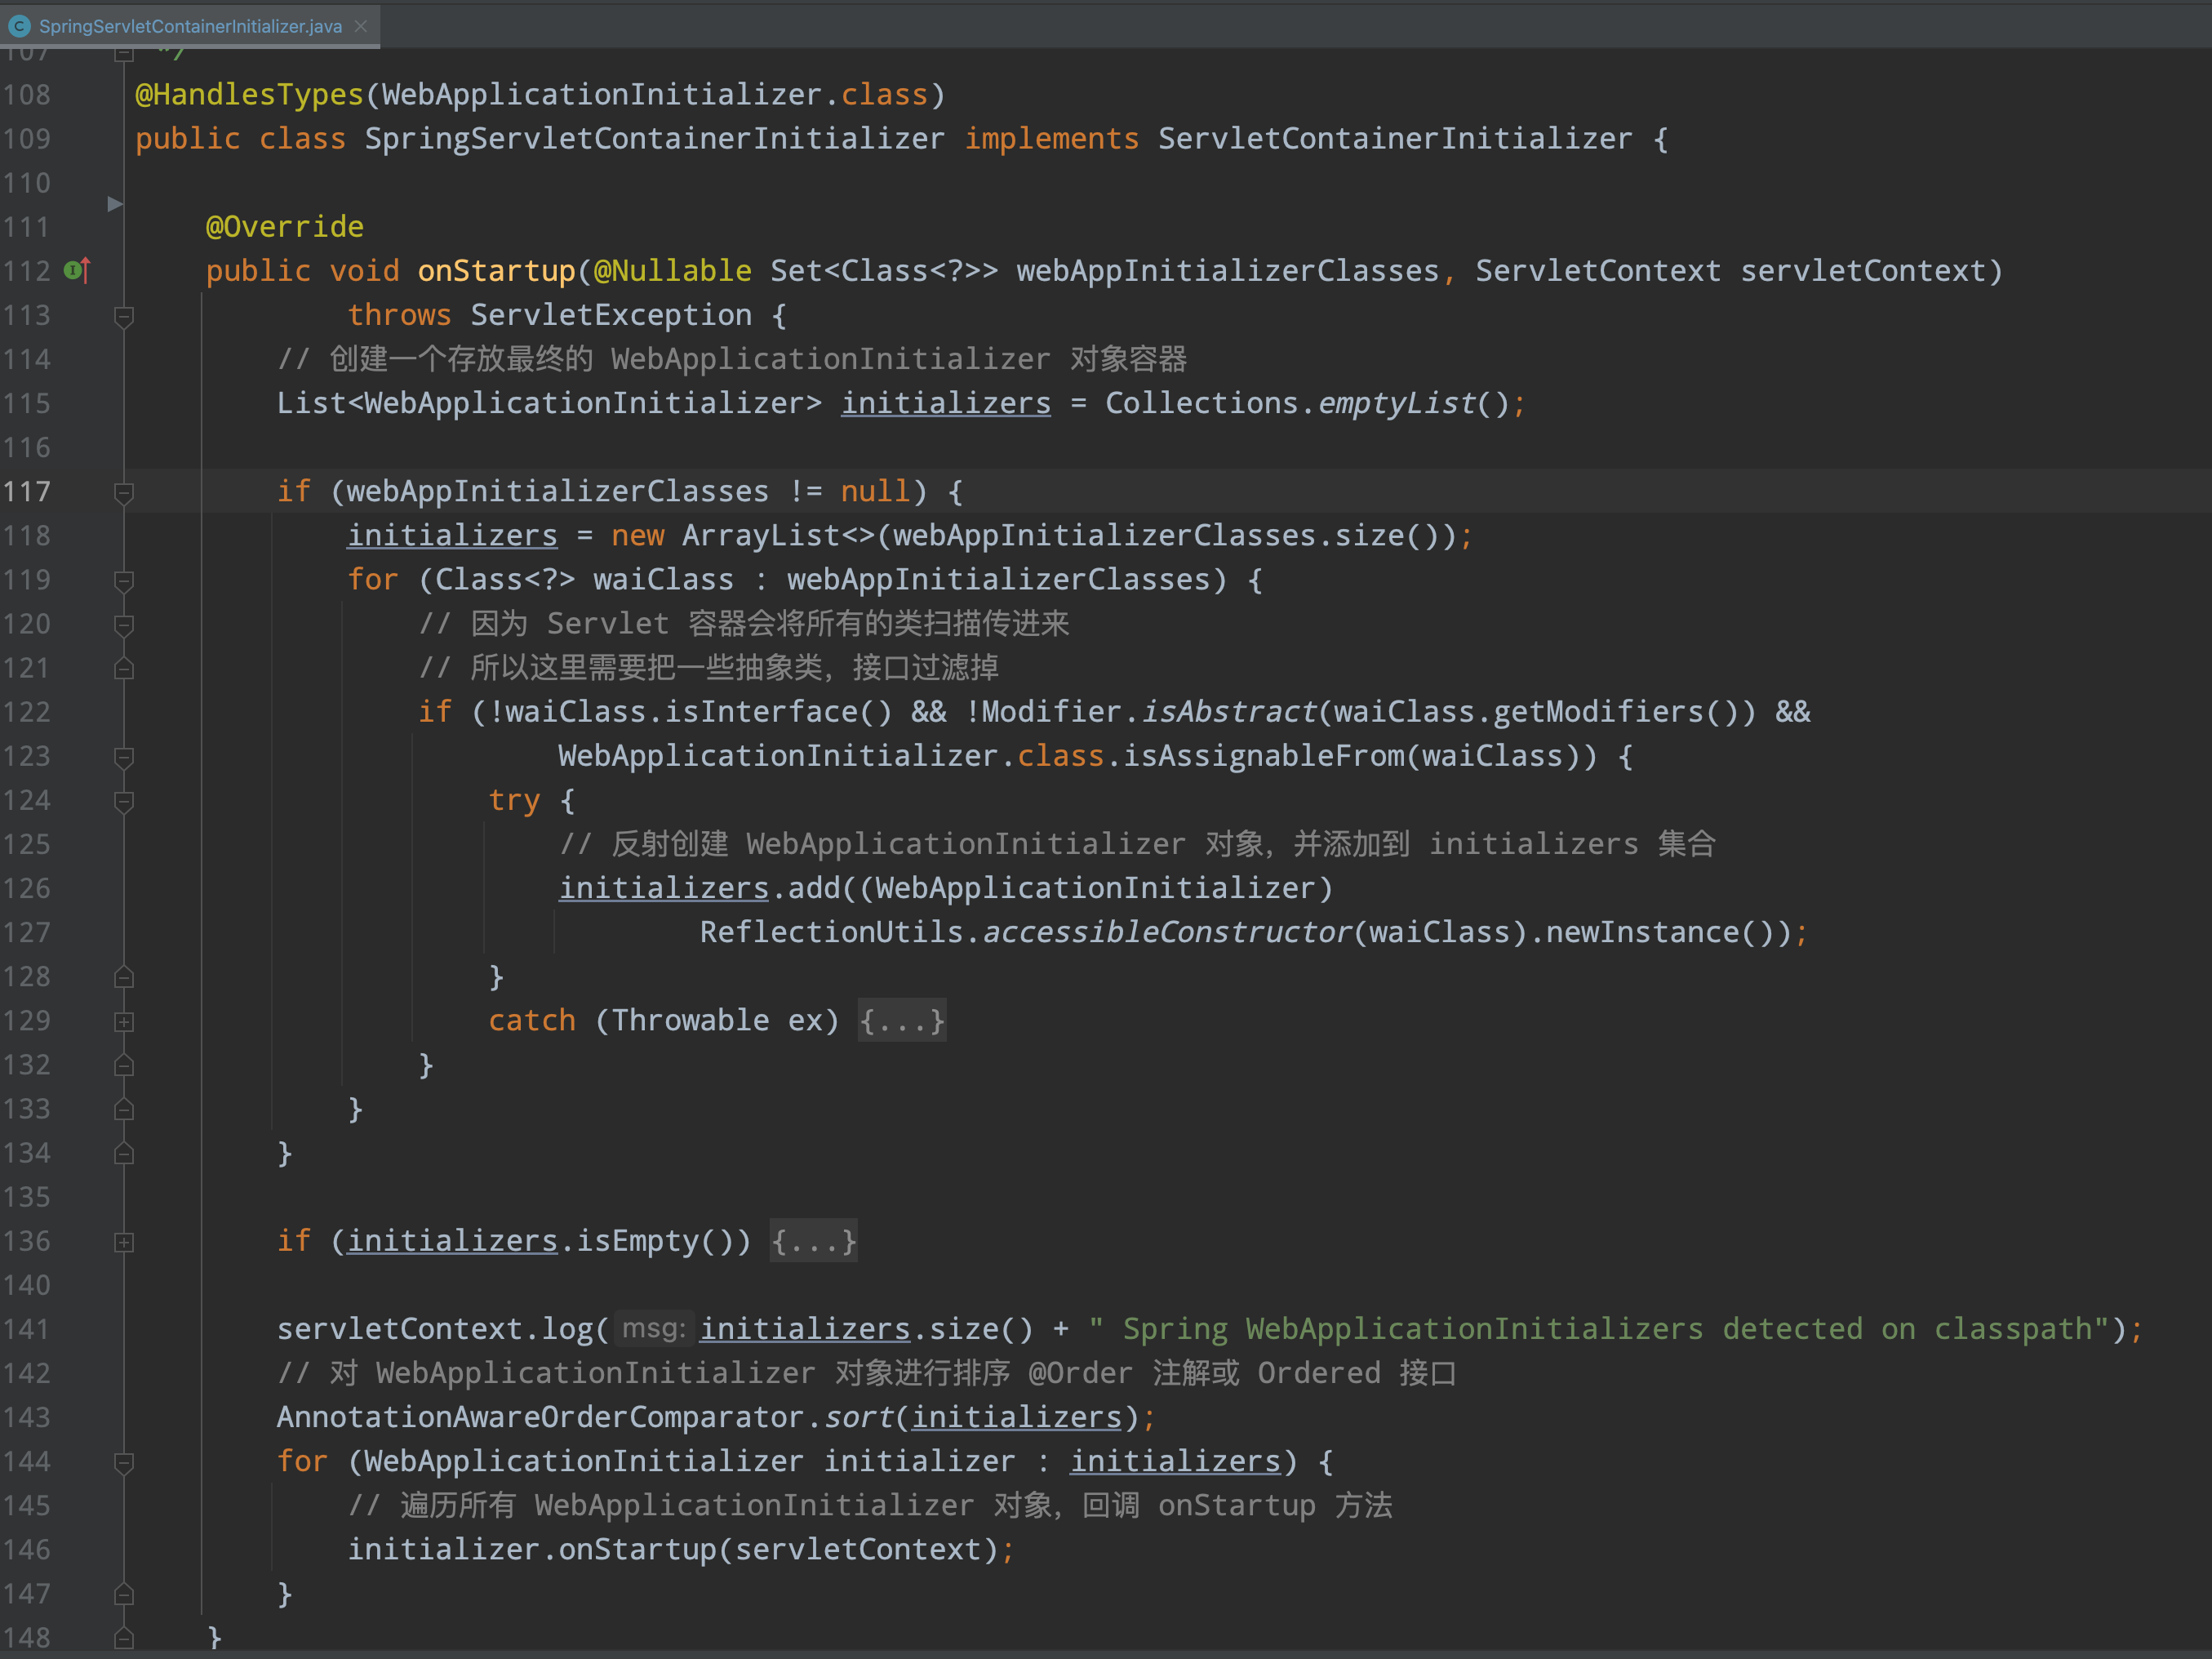
// 获取 DispatcherServlet 名字
String servletName = getServletName();
Assert.hasLength(servletName, "getServletName() must not return null or empty");
// 创建子容器,抽象方法留给子类实现去创建
WebApplicationContext servletAppContext = createServletApplicationContext();
Assert.notNull(servletAppContext, "createServletApplicationContext() must not return null");
// 创建 DispatcherServlet 并将子容器传递进去
FrameworkServlet dispatcherServlet = createDispatcherServlet(servletAppContext);
Assert.notNull(dispatcherServlet, "createDispatcherServlet(WebApplicationContext) must not return null");
// 留给子类扩展,可以实现一些 ApplicationContextInitializer 接口,来监听子容器初始化前回调
dispatcherServlet.setContextInitializers(getServletApplicationContextInitializers());
// 将 DispatcherServlet 添加到 Servlet 容器
ServletRegistration.Dynamic registration = servletContext.addServlet(servletName, dispatcherServlet);
if (registration == null) {
throw new IllegalStateException("Failed to register servlet with name '" + servletName + "'. " +
"Check if there is another servlet registered under the same name.");
}
registration.setLoadOnStartup(1);
// 添加 DispatcherServlet 路径映射
registration.addMapping(getServletMappings());
// 设置是否支持异步操作
registration.setAsyncSupported(isAsyncSupported());
// 获取所有的过滤器,留给子类实现的
Filter[] filters = getServletFilters();
if (!ObjectUtils.isEmpty(filters)) {
for (Filter filter : filters) {
// 注册监听器到 Servlet 容器
registerServletFilter(servletContext, filter);
}
}
// 留给子类实现的可以对注册的 DispatcherServlet 进行一些配置修改
customizeRegistration(registration);
}重点看一下 createServletApplicationContext 方法是用来创建子容器的,这个方法也是由子类 AbstractAnnotationConfigDispatcherServletInitializer 类去实现的:
protected WebApplicationContext createServletApplicationContext() {
   // 创建子容器
   AnnotationConfigWebApplicationContext context = new AnnotationConfigWebApplicationContext();
   // 获取我们子类实现的 getServletConfigClasses 配置类
   Class<?>[] configClasses = getServletConfigClasses();
   if (!ObjectUtils.isEmpty(configClasses)) {
      // 注册配置类进子容器
      context.register(configClasses);
   }
   return context;
}
而这个 getServletConfigClasses 方法也是调用我们自己定义的配置类,但是和创建父容器有一些不同的是,即使你没有配置配置类,还是会创建子容器,而且子容器是不允许为 Null,如果是的 Null 的话直接就抛异常了,这也侧重说明了一定父容器可以没有,但是子容器必须有。
刷新父子容器
在前面看完了创建父子容器的过程,你会发现都没有去调用 refresh 去刷新容器,那么这个容器肯定是不能用的,那么是在哪里刷新初始化的了?
刷新父容器
在我们创建父容器的时候,我们创建了一个 ContextLoaderListener 对象,而这个对象与我们刷新容器有什么关系了,如果你用过 web.xml 的配置方式,应该也会配一个 org.springframework.web.context.ContextLoaderListener 这样的监听器类吧,我们先看一下这个类的继承结构关系图:
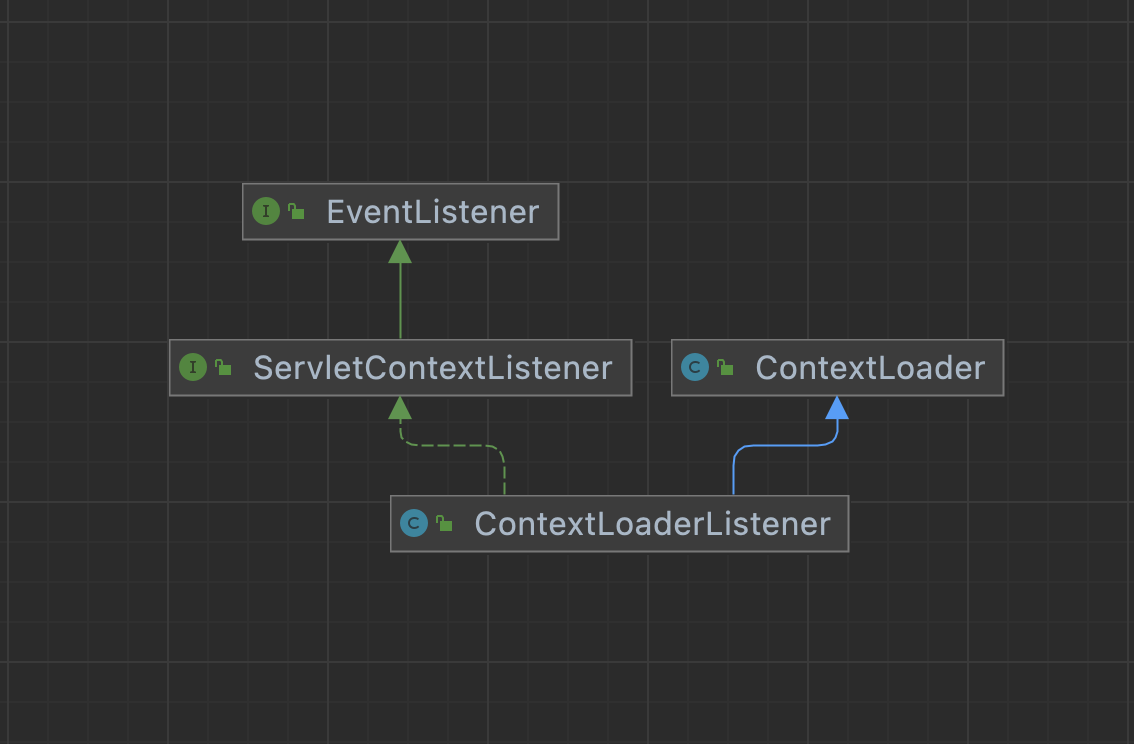
而这又是借助了 Servlet 容器提供的另一扩展实现机制,ServletContextListener 是 Servlet 规范定义的接口:
public interface ServletContextListener extends EventListener {

    /**
     * Servlet 容器上下文初始化回调
     */
    default public void contextInitialized(ServletContextEvent sce) {}

    /**
     * Servlet 容器销毁回调
     */
    default public void contextDestroyed(ServletContextEvent sce) {}
}
而我们的父容器刷新初始化,就是通过这个接口的 contextInitialized 方法回调来实现刷新和初始化的。
// ContextLoaderListener 类的
public void contextInitialized(ServletContextEvent event) {
		// 初始化父容器
		initWebApplicationContext(event.getServletContext());
	}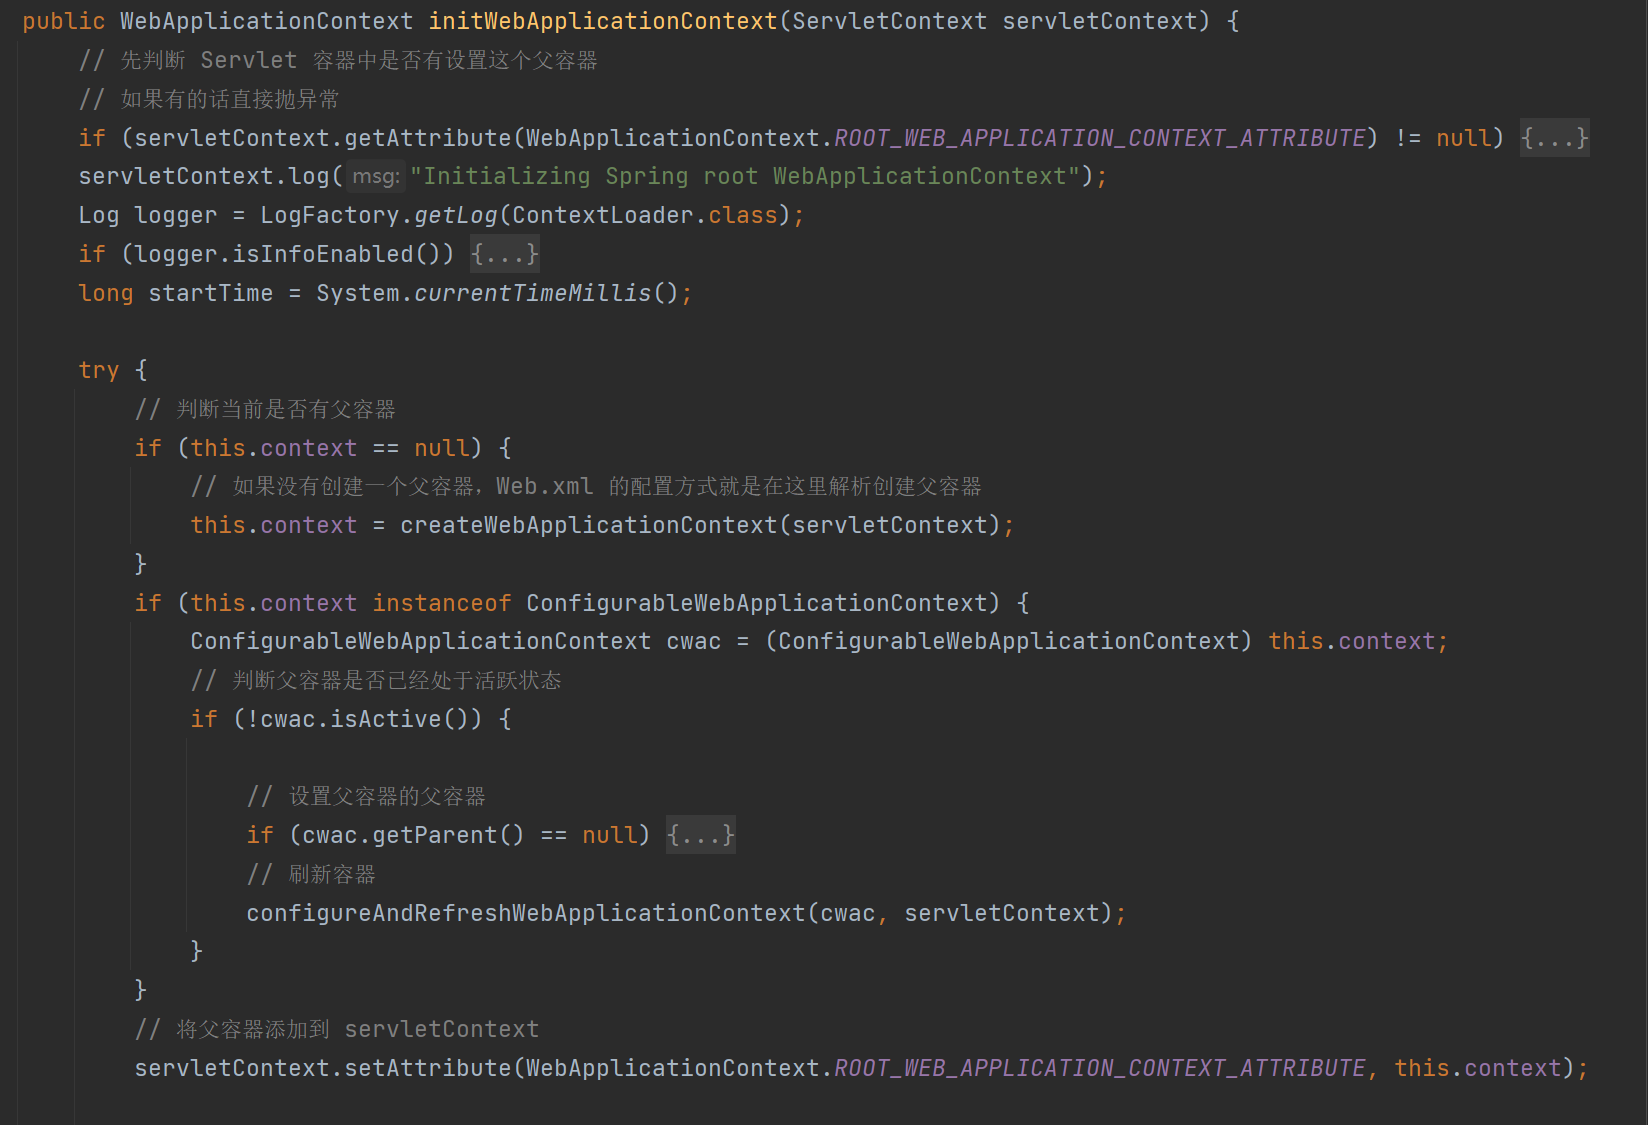
首先会去判断 Servlet 容器内是否有设置这个父容器,如果有设置的话就直接抛异常了,接着会去判断到底有没有父容器,像我们这种基于 JavaConfig 配置的方式这时候肯定是有创建父容器的,但如果你是使用基于 Web.xml 配置的方式,那么这时候就会去调用 createWebApplicationContext 创建父容器了,保证父容器已经创建完毕后,就会去检查是否有刷新过,接着检查是否有父容器可以设置,最后会去调用 configureAndRefreshWebApplicationContext 刷新初始化我们的容器,最后把真正创建好的可用的容器放入到 Servlet 容器中,因为等下子容器会初始化的时候,就会从 Servlet 容器中取出这个父容器从而产生父子关系。
那么最后再看一下 configureAndRefreshWebApplicationContext 方法刷新父容器做了那些工作?
protected void configureAndRefreshWebApplicationContext(ConfigurableWebApplicationContext wac, ServletContext sc) {
   if (ObjectUtils.identityToString(wac).equals(wac.getId())) {
      // 检查 Servlet 容器是否有设置 父容器ID
      String idParam = sc.getInitParameter(CONTEXT_ID_PARAM);
      if (idParam != null) {
         wac.setId(idParam);
      }
      else {
         // 生成一个默认的 ID
         wac.setId(ConfigurableWebApplicationContext.APPLICATION_CONTEXT_ID_PREFIX +
               ObjectUtils.getDisplayString(sc.getContextPath()));
      }
   }
   // 为父容器设置 ServletContext 上下文对象
   wac.setServletContext(sc);
   // web.xml 会设置的一个属性值 contextConfigLocation
   String configLocationParam = sc.getInitParameter(CONFIG_LOCATION_PARAM);
   if (configLocationParam != null) {
      wac.setConfigLocation(configLocationParam);
   }

   // 将 ServletContext 的一些属性值存放到父容器的环境变量对象中
   ConfigurableEnvironment env = wac.getEnvironment();
   if (env instanceof ConfigurableWebEnvironment) {
      ((ConfigurableWebEnvironment) env).initPropertySources(sc, null);
   }
   // 回调所有 ApplicationContextInitializer 接口的 initialize
   customizeContext(sc, wac);
   // 刷新父容器,此时父容器就已经是一个完全可用的容器了
   wac.refresh();
}
刷新子容器
在创建子容器的时候,我们在创建 DispatcherServlet 的使用把子容器作为参数传递进行了,而我们刷新子容器正是借助与 DispatcherServlet 来实现的,我们知道 DispatcherServlet 实际就是 Servlet,而 Servlet 有一个生命周期方法 init ,而 Spring 正是借助这个回调方法去刷新子容器的。
先调用 DispatcherServlet 的父父类 HttpServletBean 的 init 方法:
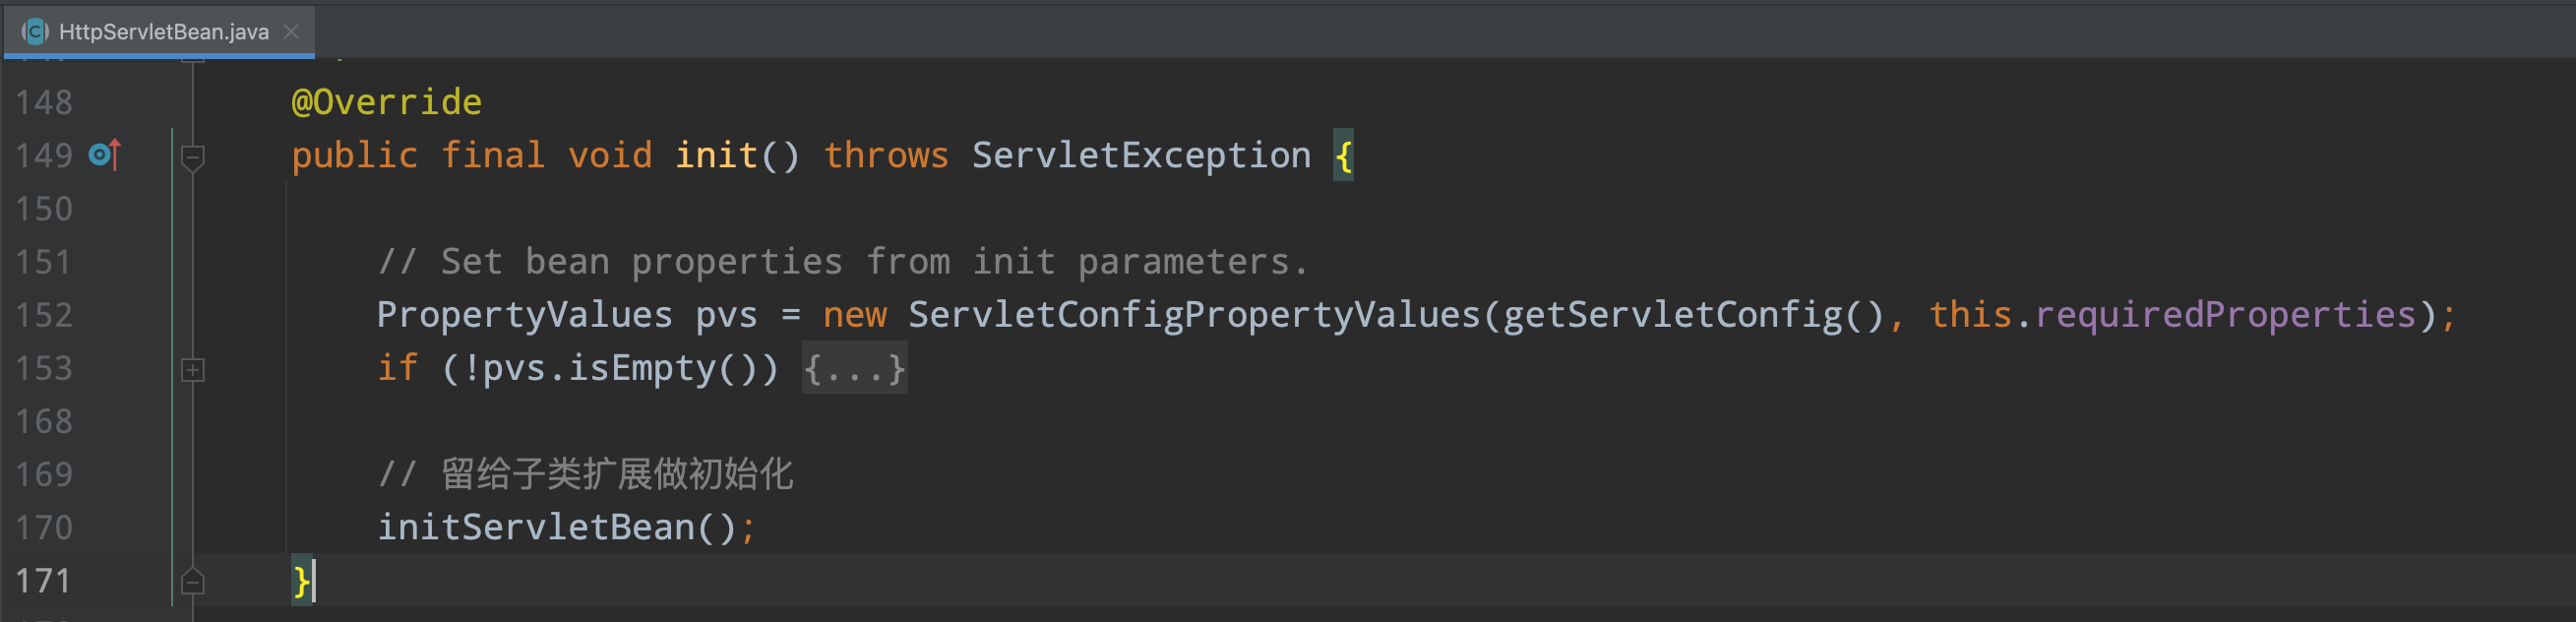
再调用 DispatcherServlet 父类 FrameworkServlet 的 initServletBean 方法:
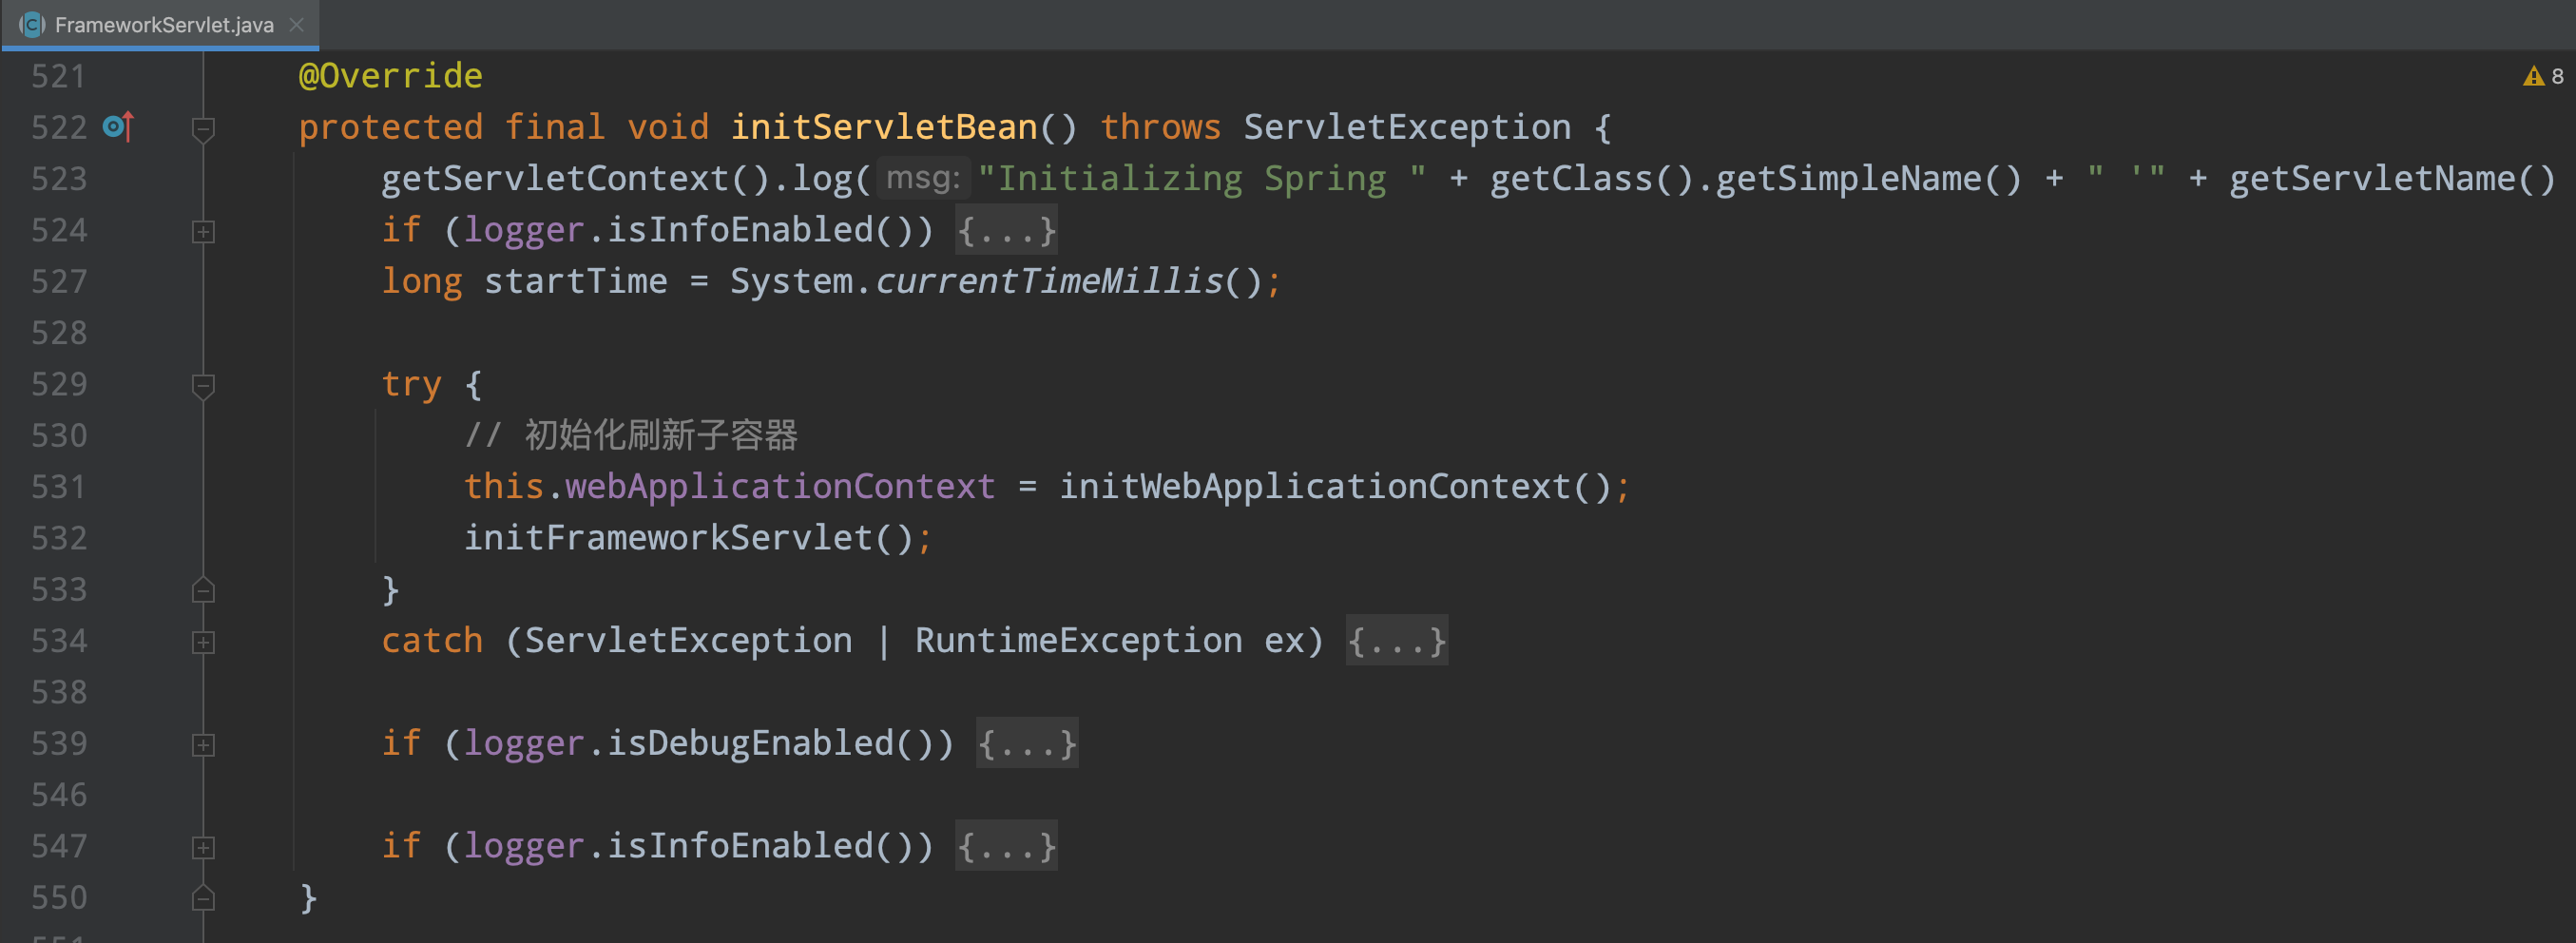
最终再调用 DispatcherServlet 父类 FrameworkServlet 的 initWebApplicationContext 方法:
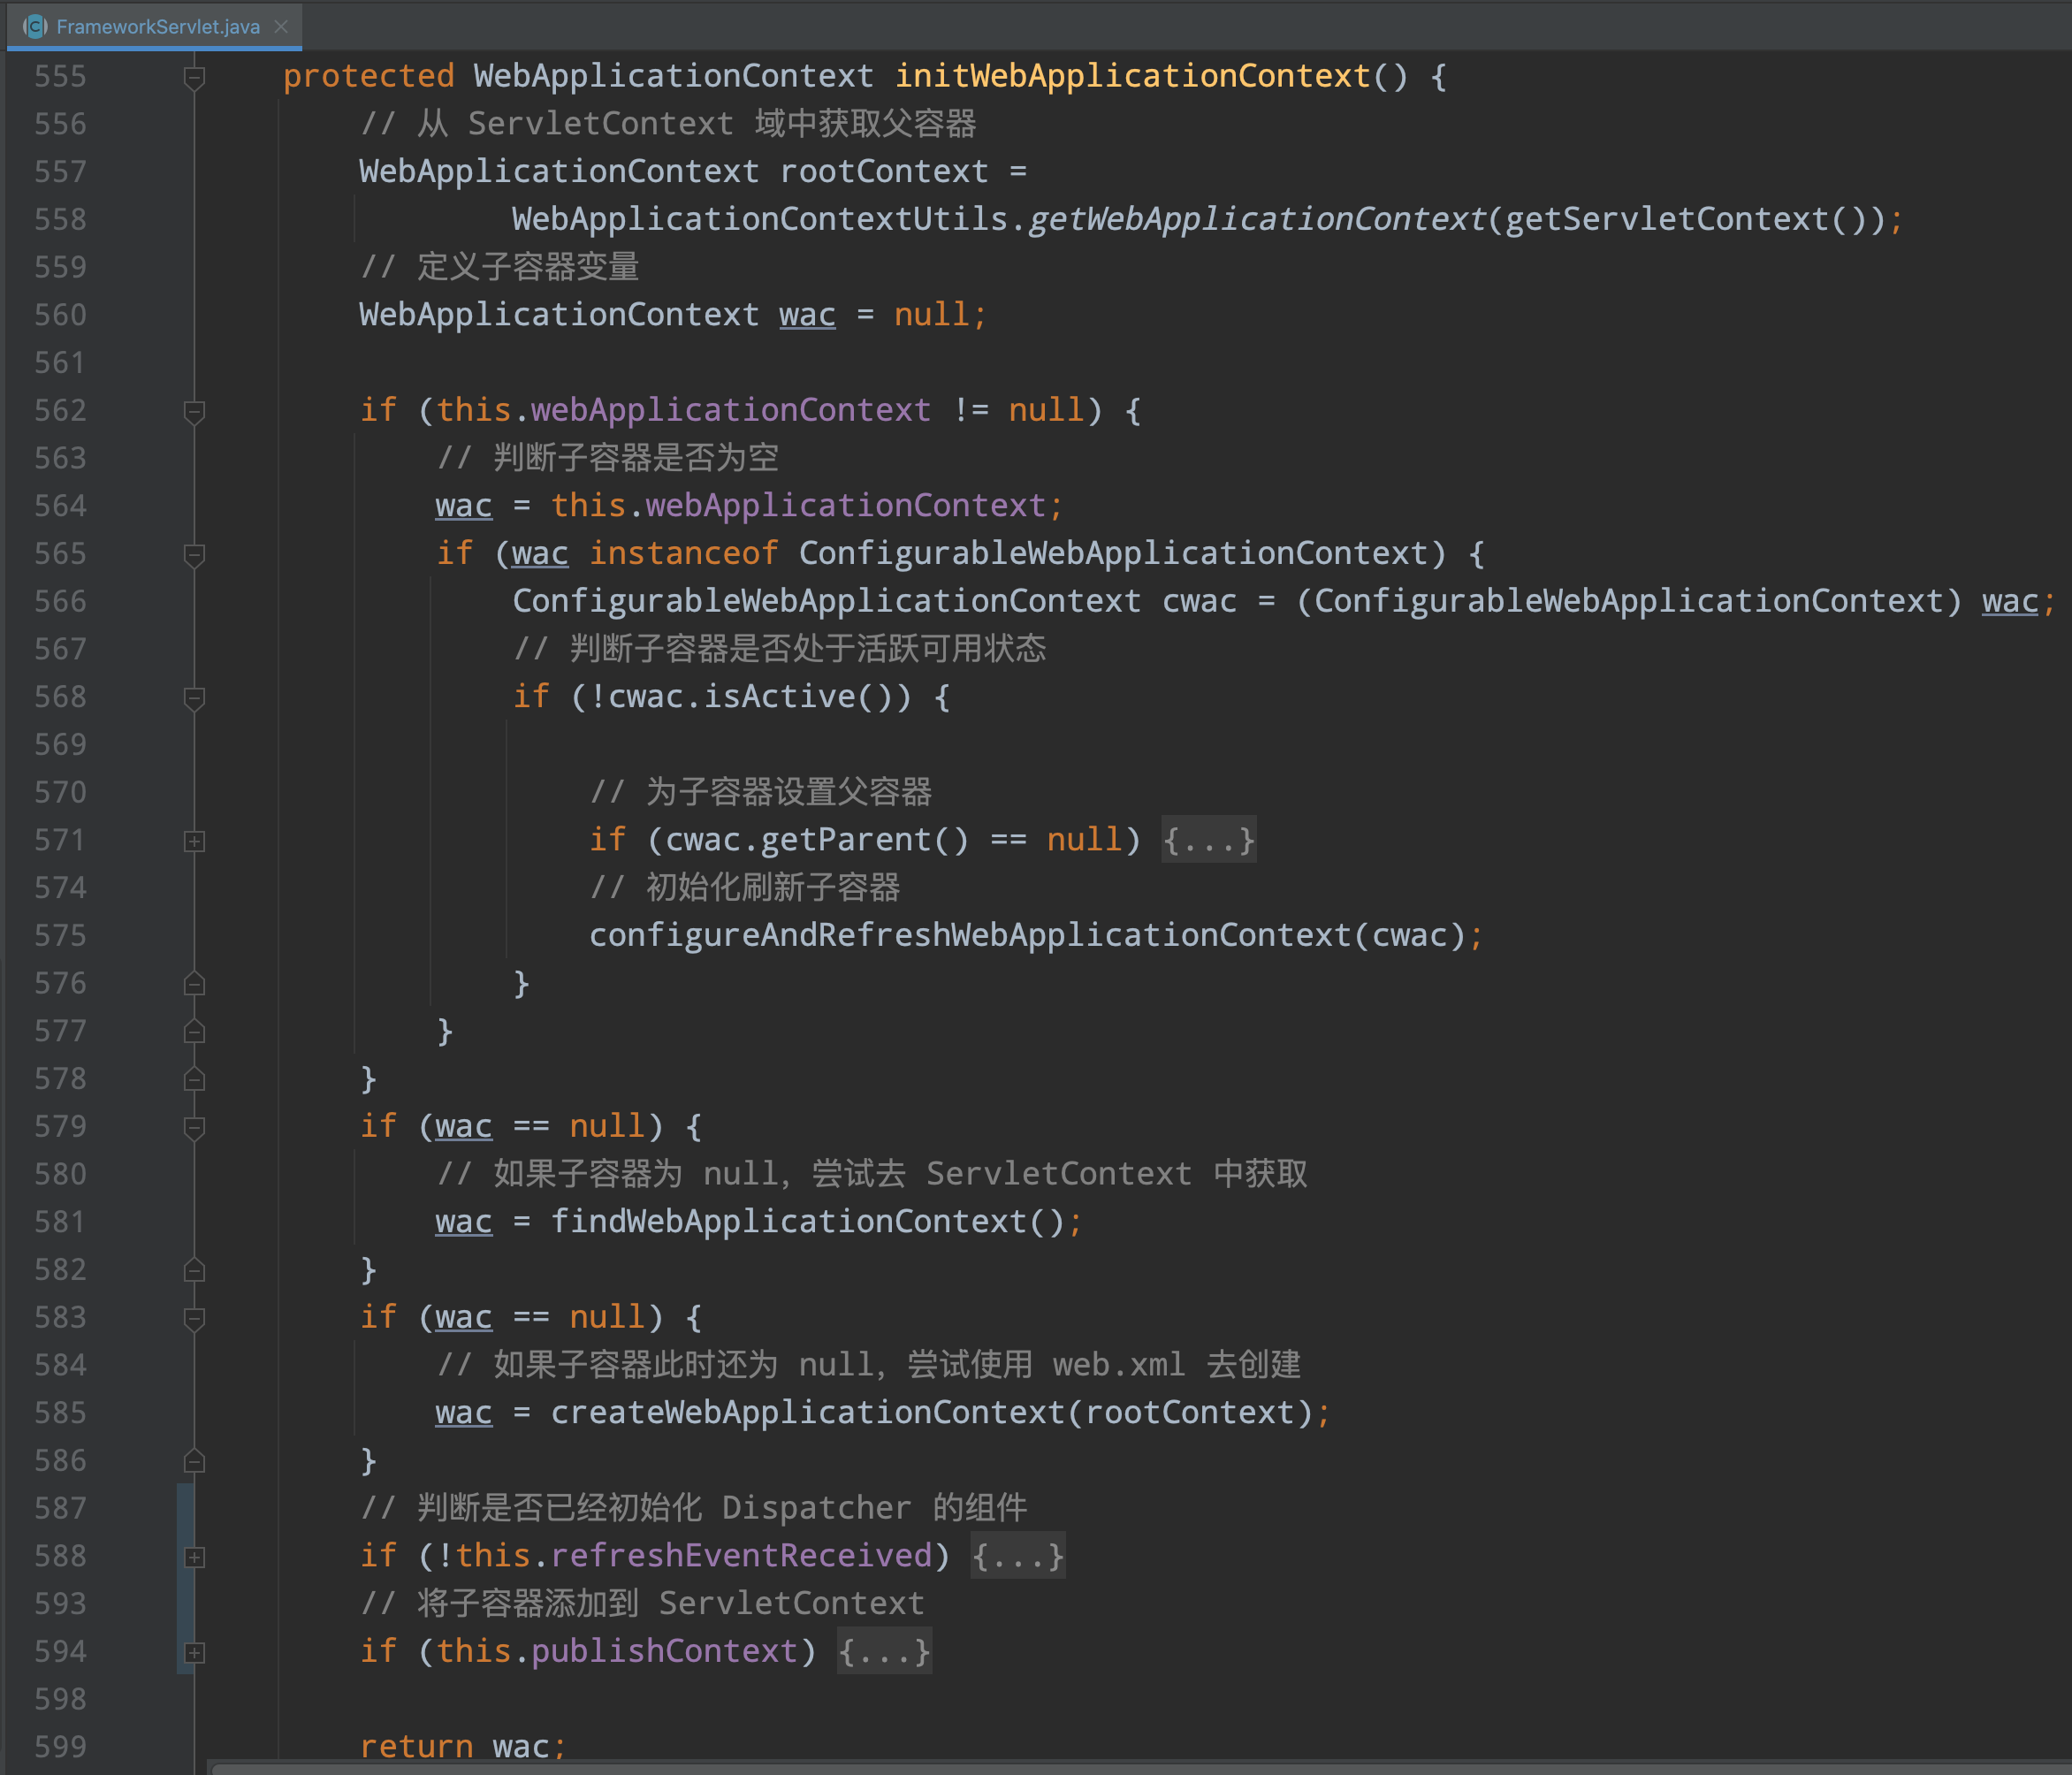
我们主要看一下 configureAndRefreshWebApplicationContext 刷新子容器这个方法:
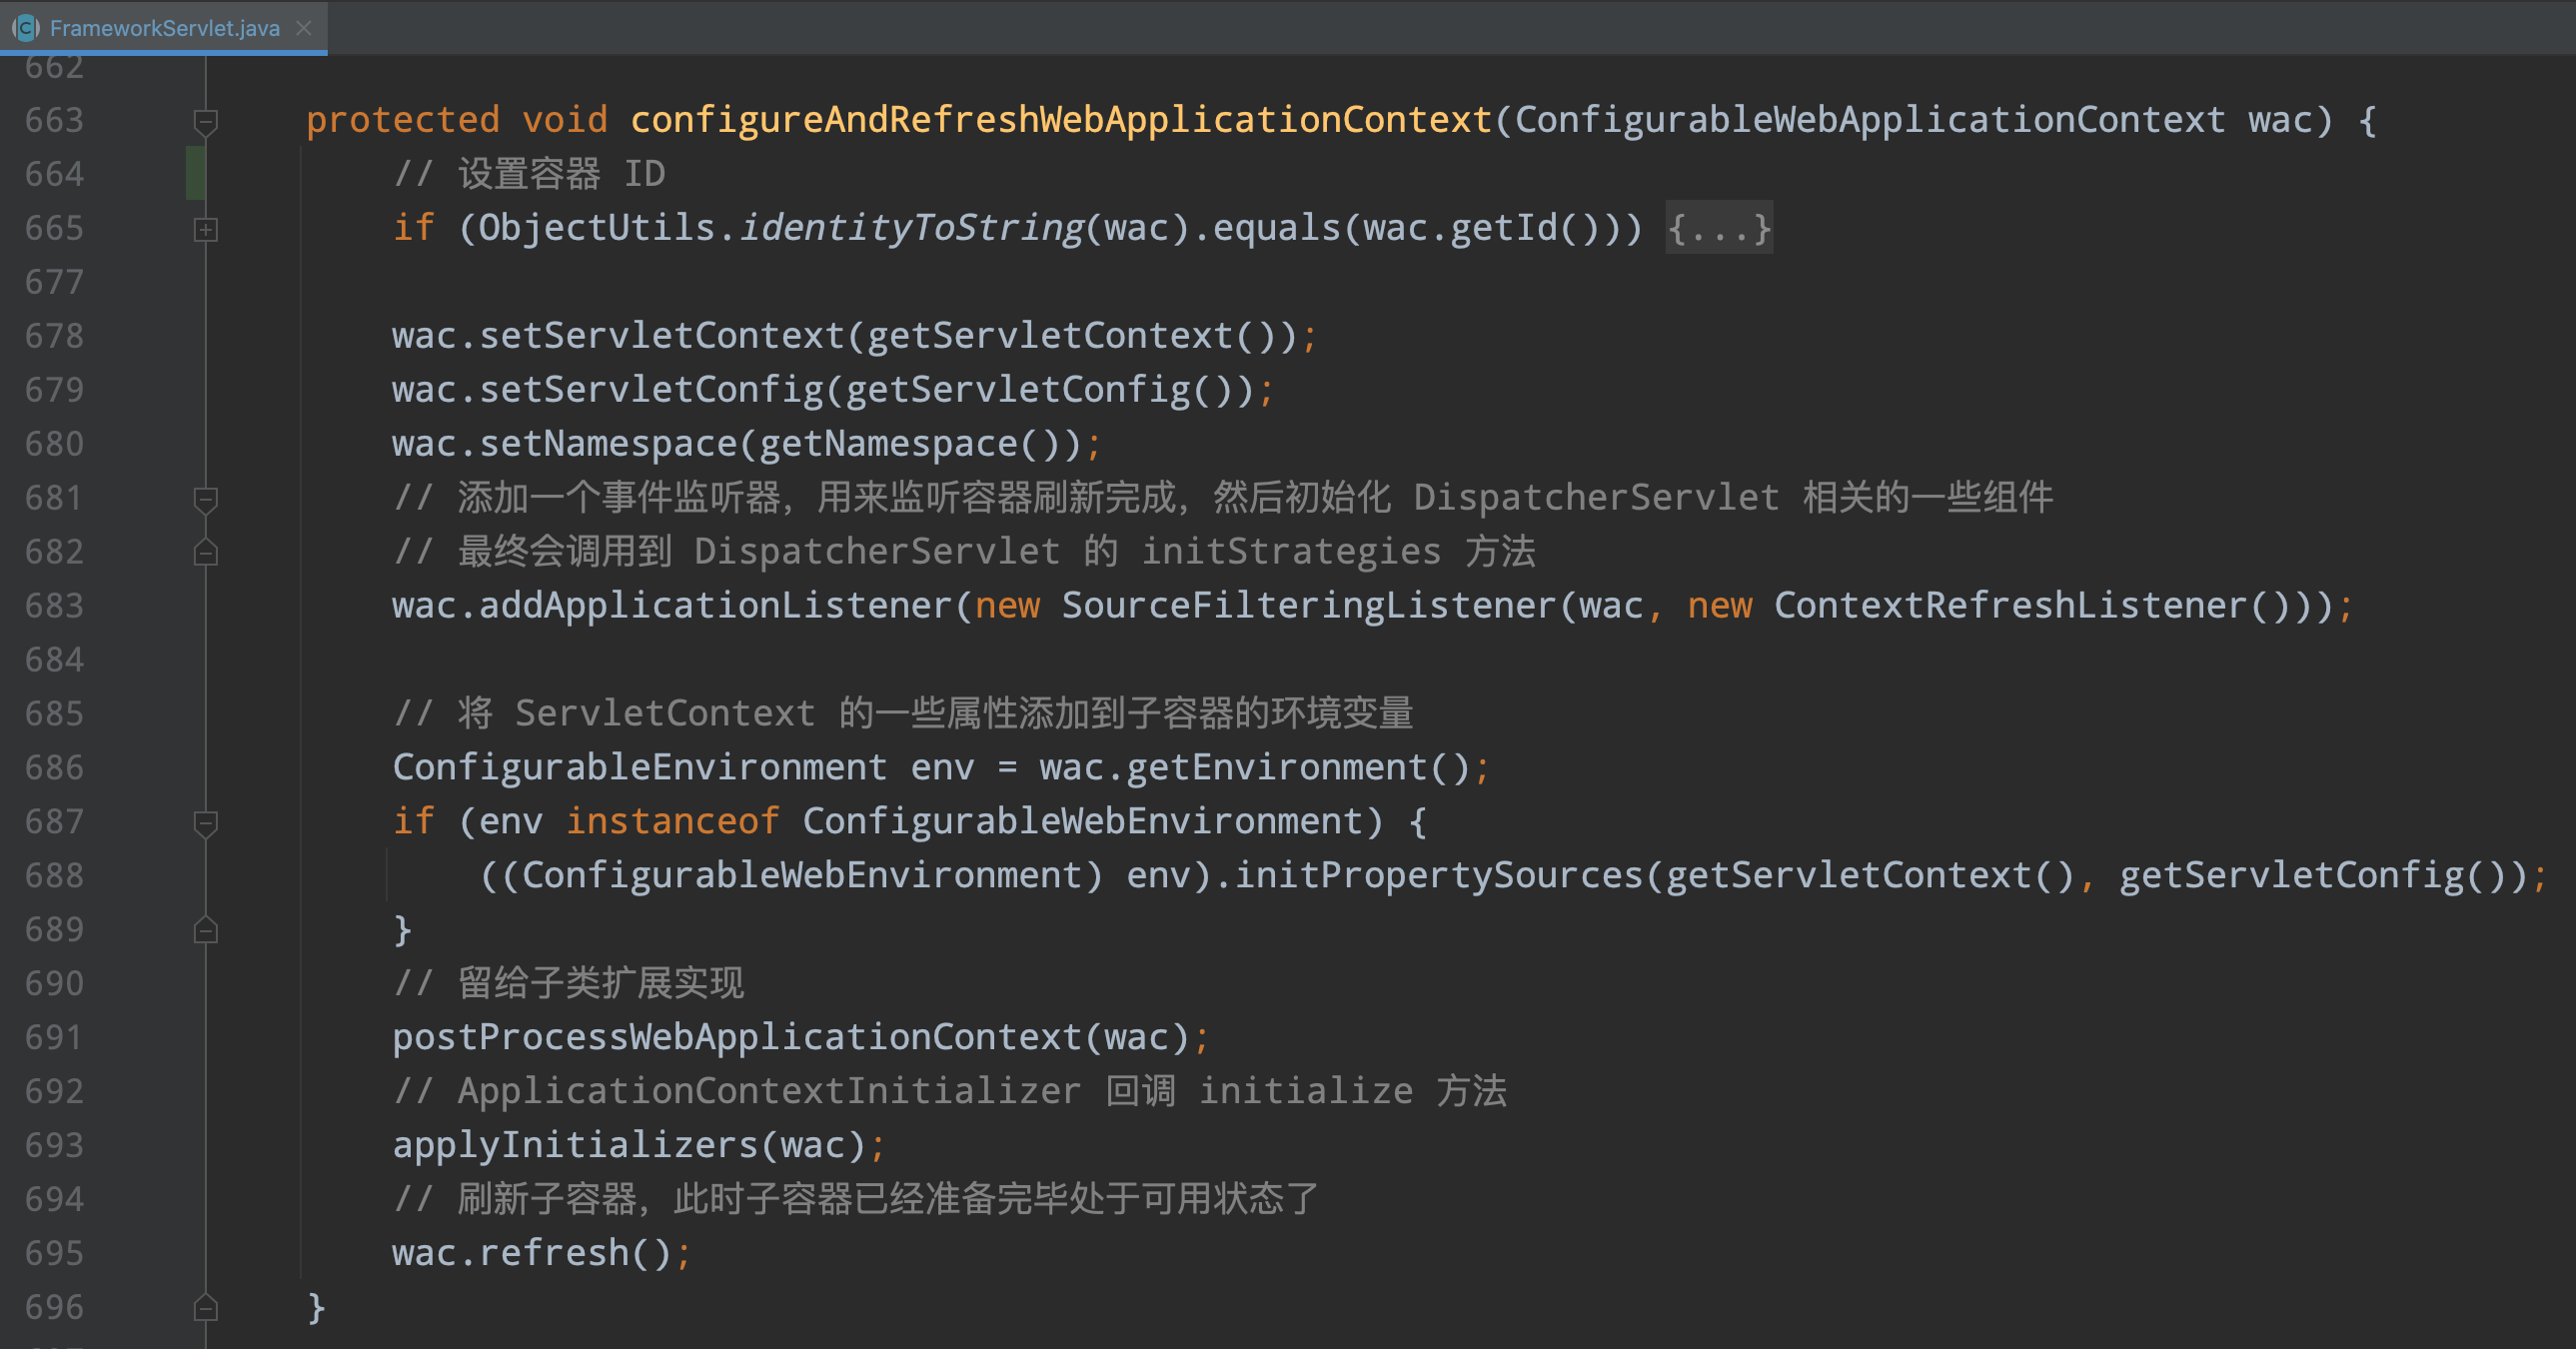
基本和父容器刷新的过程差不多,多了一个步骤就是在子容器刷新的时候会去注册一个监听器,而这个监听器干嘛的了?就是会去监听容器刷新完毕,因为在 refresh 方法刷新完容器后,会发布一个容器刷新完毕的事件,它这里监听这个容器刷新完成的事件,就是用来给 SpringMvc 组件初始化。最终会调用到 DispatcherServlet 的 initStrategies 方法,我们可以看一下这个方法初始化了那些组件。
protected void initStrategies(ApplicationContext context) {
   // 初始化文件处理解析器
   initMultipartResolver(context);
   // 初始化我们web上下文对象用于处理国际化资源的
   initLocaleResolver(context);
   // 主题解析器对象初始化
   initThemeResolver(context);
   // 初始化我们的HandlerMapping
   initHandlerMappings(context);
   // 实例化我们的HandlerAdapters
   initHandlerAdapters(context);
   // 实例化我们处理器异常解析器对象
   initHandlerExceptionResolvers(context);
   initRequestToViewNameTranslator(context);
   // 给 DispatcherServlet的ViewResolvers处理器
   initViewResolvers(context);
   initFlashMapManager(context);
}
那么它们是怎么初始化的了,其实就是去容器内找一些对应的类,然后赋值到 DispatcherServlet 的成员变量上,我这里以分析一个 initHandlerMappings 为例:
private void initHandlerMappings(ApplicationContext context) {
   this.handlerMappings = null;
   // 先尝试中容器中获取 HandlerMapping,包括父容器
   if (this.detectAllHandlerMappings) {
      Map<String, HandlerMapping> matchingBeans =
            BeanFactoryUtils.beansOfTypeIncludingAncestors(context, HandlerMapping.class, true, false);
      if (!matchingBeans.isEmpty()) {
         this.handlerMappings = new ArrayList<>(matchingBeans.values());
         // 排序
         AnnotationAwareOrderComparator.sort(this.handlerMappings);
      }
   } else {
      try {
         HandlerMapping hm = context.getBean(HANDLER_MAPPING_BEAN_NAME, HandlerMapping.class);
         this.handlerMappings = Collections.singletonList(hm);
      } catch (NoSuchBeanDefinitionException ex) {
         // Ignore, we'll add a default HandlerMapping later.
      }
   }


   if (this.handlerMappings == null) {
      // 容器中未找到,注册一些默认的
      this.handlerMappings = getDefaultStrategies(context, HandlerMapping.class);
      if (logger.isTraceEnabled()) {
         logger.trace("No HandlerMappings declared for servlet '" + getServletName() +
               "': using default strategies from DispatcherServlet.properties");
      }
   }

   for (HandlerMapping mapping : this.handlerMappings) {
      if (mapping.usesPathPatterns()) {
         this.parseRequestPath = true;
         break;
      }
   }
}
首先会去容器中找有没有对应的 HandlerMapping 类型 Bean,一般来说这里是会找不到的,因为我们平常使用的时候不会定义注册的,那么容器里没找到,就会调用 getDefaultStrategies 方法去获取一些默认的:
protected <T> List<T> getDefaultStrategies(ApplicationContext context, Class<T> strategyInterface) {
   if (defaultStrategies == null) {
      try {
         // 从 DispatcherServlet.properties 加载一些默认实现的 HandlerMapping
         ClassPathResource resource = new ClassPathResource(DEFAULT_STRATEGIES_PATH, DispatcherServlet.class);
         defaultStrategies = PropertiesLoaderUtils.loadProperties(resource);
      } catch (IOException ex) {
         throw new IllegalStateException("Could not load '" + DEFAULT_STRATEGIES_PATH + "': " + ex.getMessage());
      }
   }

   String key = strategyInterface.getName();
   String value = defaultStrategies.getProperty(key);
   if (value != null) {
      String[] classNames = StringUtils.commaDelimitedListToStringArray(value);
      List<T> strategies = new ArrayList<>(classNames.length);
      for (String className : classNames) {
         try {
            Class<?> clazz = ClassUtils.forName(className, DispatcherServlet.class.getClassLoader());
            Object strategy = createDefaultStrategy(context, clazz);
            strategies.add((T) strategy);
         } catch (ClassNotFoundException ex) {
            throw new BeanInitializationException(
                  "Could not find DispatcherServlet's default strategy class [" + className +
                        "] for interface [" + key + "]", ex);
         } catch (LinkageError err) {
            throw new BeanInitializationException(
                  "Unresolvable class definition for DispatcherServlet's default strategy class [" +
                        className + "] for interface [" + key + "]", err);
         }
      }
      return strategies;
   } else {
      return Collections.emptyList();
   }
}
在 Spring-webMvc 模块下类路径下有一个 DispatcherServlet.properties 配置文件
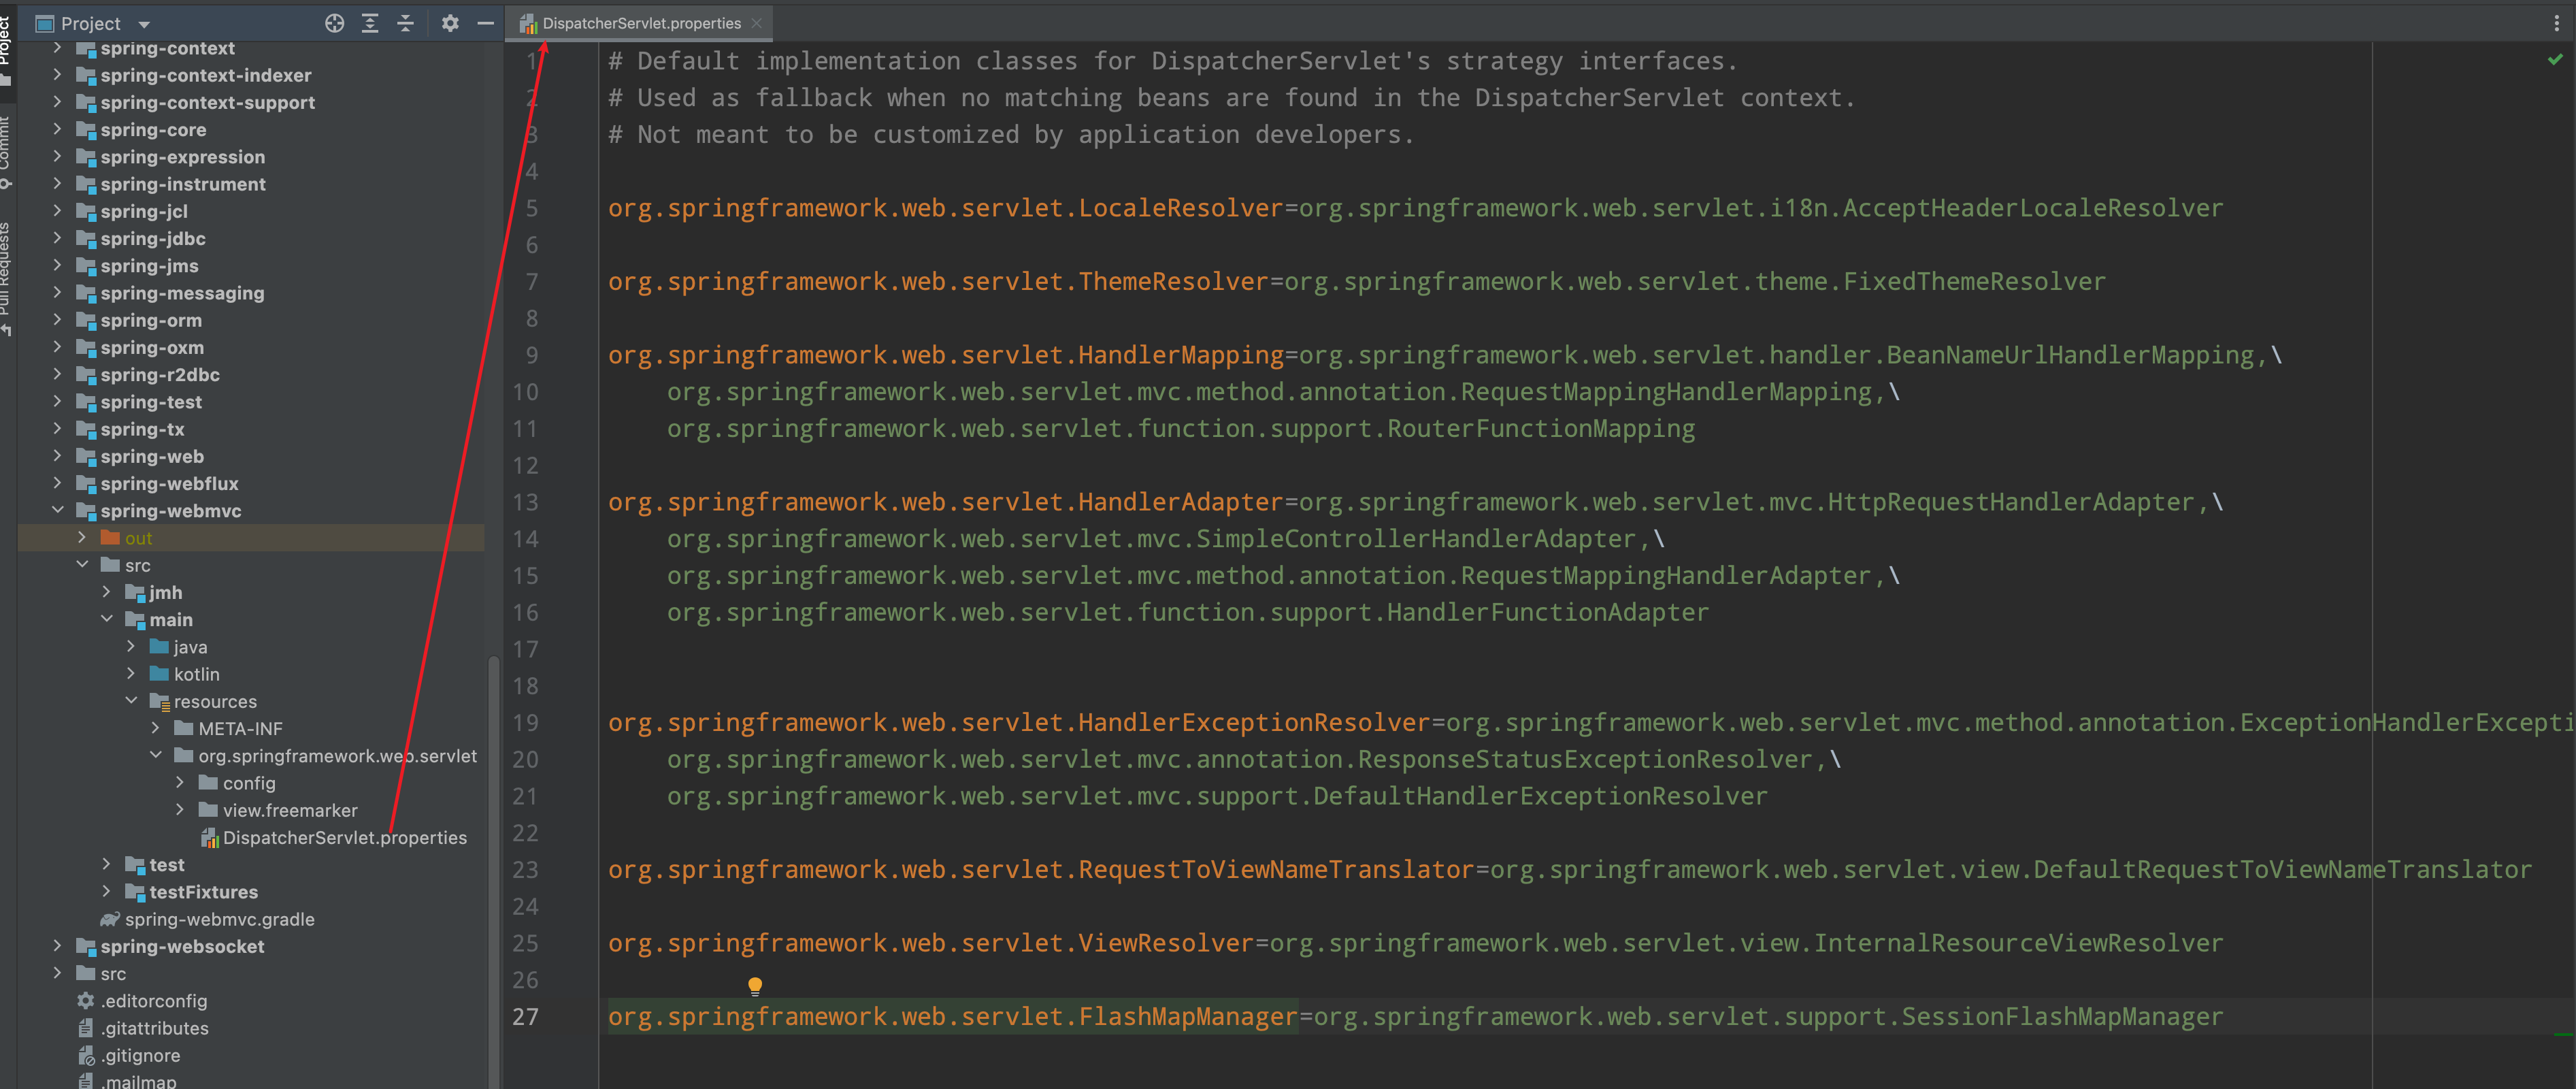
在这里配置文件就定义了一些默认实现类,其实所谓的初始化组件就是加载这个配置文件,然后拿到这些类名,反射创建对象,然后赋值到 DispatcherServlet 到成员变量上。
总结
SpringMvc 通过 Servlet 提供的 ServletContainerInitializer 接口的 SPI 机制,来创建自己的父子容器,然后通过 ServletContextListener 的 contextInitialized 回调方法进行父容器的刷新初始化,如果你使用的是 web.xml 的方式配置,那么就会在这里创建并刷新父容器。而子容器则是通过与 DispatcherServlet 捆绑然后通过 init 回调方法进行子容器的刷新初始化,而如果你使用的是 web.xml 的方式配置,那么也会在这里创建并刷新子容器。
<?xml version="1.0" encoding="UTF-8"?>
<web-app version="4.0" xmlns="http://xmlns.jcp.org/xml/ns/javaee"
       xmlns:xsi="http://www.w3.org/2001/XMLSchema-instance"
       xsi:schemaLocation="http://xmlns.jcp.org/xml/ns/javaee
   http://xmlns.jcp.org/xml/ns/javaee/web-app_4_0.xsd">

   <!-- 配置父容器 -->
   <listener>
      <listener-class>org.springframework.web.context.ContextLoaderListener</listener-class>
   </listener>
   <context-param>
      <param-name>contextConfigLocation</param-name>
      <param-value>classpath:root-config.xml</param-value>
   </context-param>

   <!-- 配置子容器 -->
   <servlet>
      <servlet-name>dispatcherServlet</servlet-name>
      <servlet-class>org.springframework.web.servlet.DispatcherServlet</servlet-class>
      <init-param>
         <param-name>contextConfigLocation</param-name>
         <param-value>classpath:web-config.xml</param-value>
      </init-param>
      <load-on-startup>1</load-on-startup>
   </servlet>

   <servlet-mapping>
      <servlet-name>dispatcherServlet</servlet-name>
      <url-pattern>/*</url-pattern>
   </servlet-mapping>
</web-app>
现在回过头来看基于 web.xml 配置的方式,你是否更加清晰一点为什么需要这么配置了吗?
Spring — Sep 19, 2022